Rediacc Platform User Guide
Overview
Rediacc is a cloud platform offering AI-powered backup services.
This guide explains the basic usage of the web interface at https://www.rediacc.com/.
Purpose of This Guide
- Help new users quickly adapt to the platform
- Explain basic functions (resource management, backup) step by step
1. Account Creation and Login
1.1 Registration
To start using the Rediacc platform, you first need to create an account.
 (Figure 1: Main login page, showing the Rediacc platform’s main features)
- Navigate to https://www.rediacc.com/ in your browser.
- Click the Sign In button in the top right corner of the page.
- Choose Get Started for free access or Request Demo for a demonstration.
Tip: You can create a free account without requiring any credit card. Includes unlimited teams.
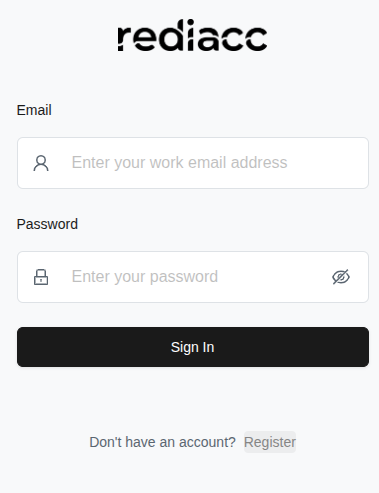 (Figure 2: Sign In screen for existing users)
-
If you don’t have an account, click the Register link to create a new account.
-
Fill in the following information in the form that opens:
- Organization Name: Enter your organization name
- Email: Enter a valid email address
- Password: Create a password with at least 8 characters
- Confirm Password: Re-enter the same password
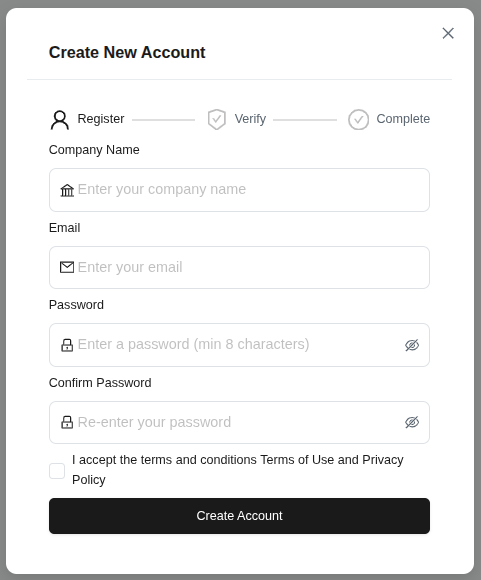 (Figure 3: New user registration step-by-step form - Register > Verify > Complete)
- Check the box to accept the terms of service and privacy policy.
- Click the Create Account button.
Tip: Password must be at least 8 characters and should be strong. All fields are required.
- Enter the 6-digit verification code sent to your email in the boxes sequentially.
- Click the Verify Account button.
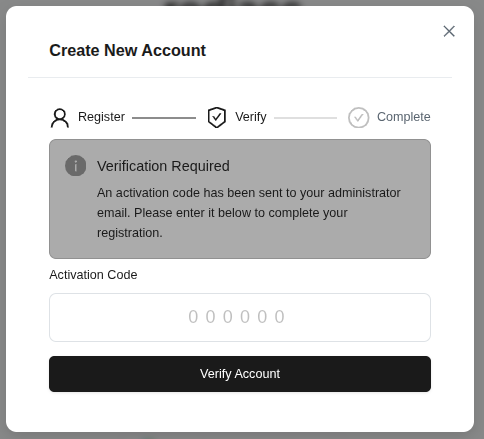 (Figure 4: Window for entering the activation code sent to the administrator)
Tip: The verification code is valid for a limited time. If you don’t receive the code, check your spam folder.
1.2 Signing In
After your account is created, you can log in to the platform.
- Fill in the Email field (required if a red warning appears).
- Fill in the Password field.
- Click the Sign In button.
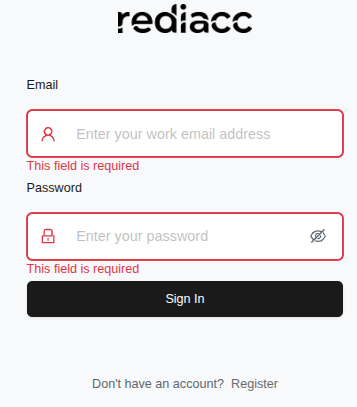 (Figure 5: Login form - error messages are marked with a red border)
Tip: If the error message says “This field is required”, fill in the empty fields. Contact the administrator for forgotten passwords.
- After successful login, you will be redirected to the Dashboard screen.
 (Figure 6: Main dashboard after successful login - Organization, Machines, and Settings menus in the left sidebar)
Tip: The dashboard auto-refreshes. You can refresh the page with F5 for fresh information.
2. Interface Overview
After logging in, the screen you see consists of these main sections:
- Organization: Users, teams, and access control
- Machines: Server and repository management
- Settings: Profile and system settings
- Storage: Storage area management
- Credentials: Access credentials
- Queue: Job queue management
- Audit: System audit logs
2.1 Organization - Users
User management allows you to control access to the platform for people in your organization.
2.1.1 Adding Users
- Click Organization > Users option in the left sidebar.
- View the list of all users in table format.
- Each user row shows email, status (Active/Inactive), permission group, and last activity time.
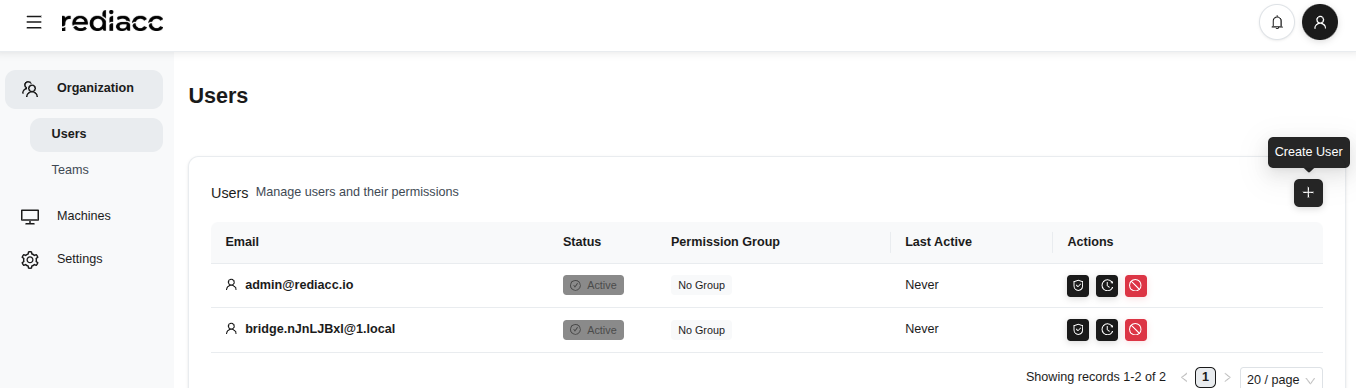 (Figure 7: Users section under Organization - all users’ information is displayed)
- Click the ”+” icon in the top right corner.
- Click the Create User button and fill in the form that opens:
- Email: Enter the user’s email address
- Password: Enter a temporary password
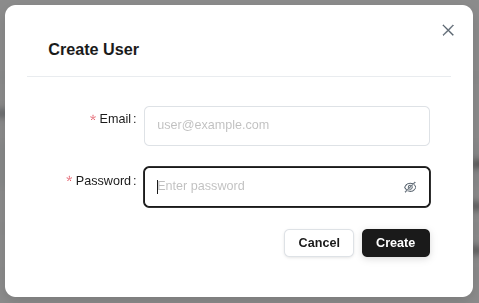 (Figure 8: Modal window for adding new user - simple and quick user creation form)
- Click the Create button.
Tip: Login credentials should be securely communicated to the created user. Changing the password on first login is recommended.
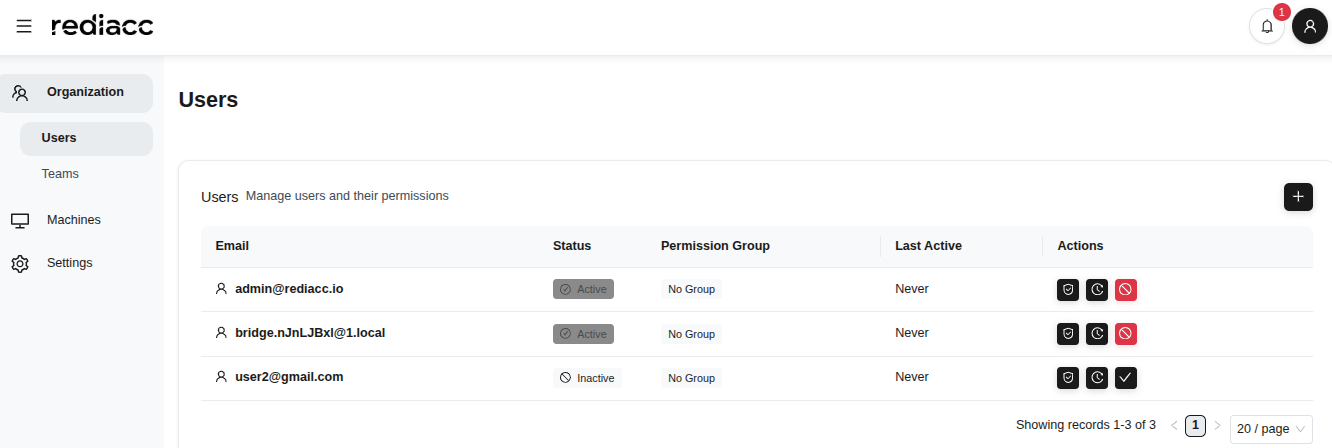 (Figure 9: All active and inactive users on the users management page)
Tip: The page automatically shows 20 records. Use pagination to see more records.
2.1.2 Assigning User Permissions
You can manage access rights by assigning specific permission groups to users.
- Select a user from the Organization > Users tab.
- Click the shield icon in the actions column (Permissions).
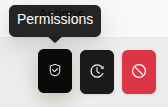 (Figure 10: Icon display of user actions - each icon represents a different action)
- Select a Permission Group from the form that opens.
- The number of users and permissions in the group is shown next to the user.
- Click the Assign Permissions button to save the changes.
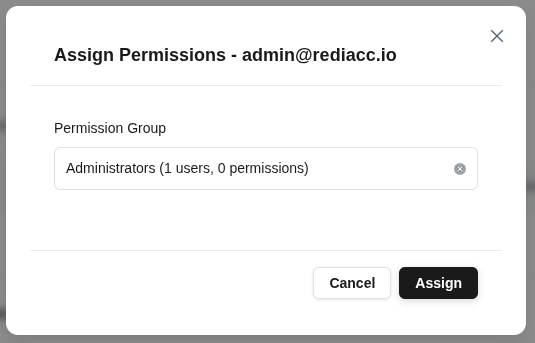 (Figure 11: Modal for assigning permission group to selected user - dropdown with available groups)
Tip: Some permission groups are fixed by the system and cannot be changed.
2.1.3 User Activation
You can reactivate disabled users.
- Find the user with inactive status in the Users list.
- Click the red icon in the actions column.
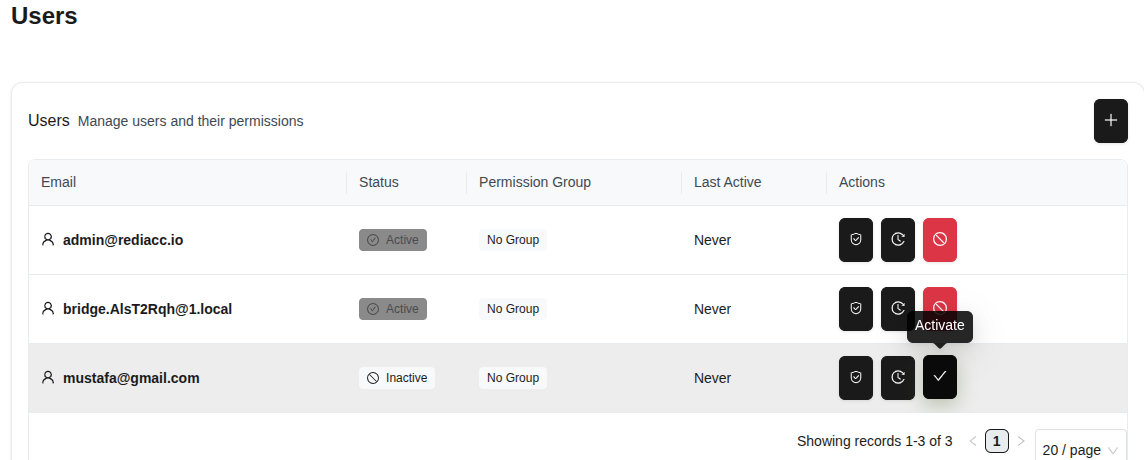 (Figure 12: Activating an inactive user)
- Click the Yes button in the confirmation window.
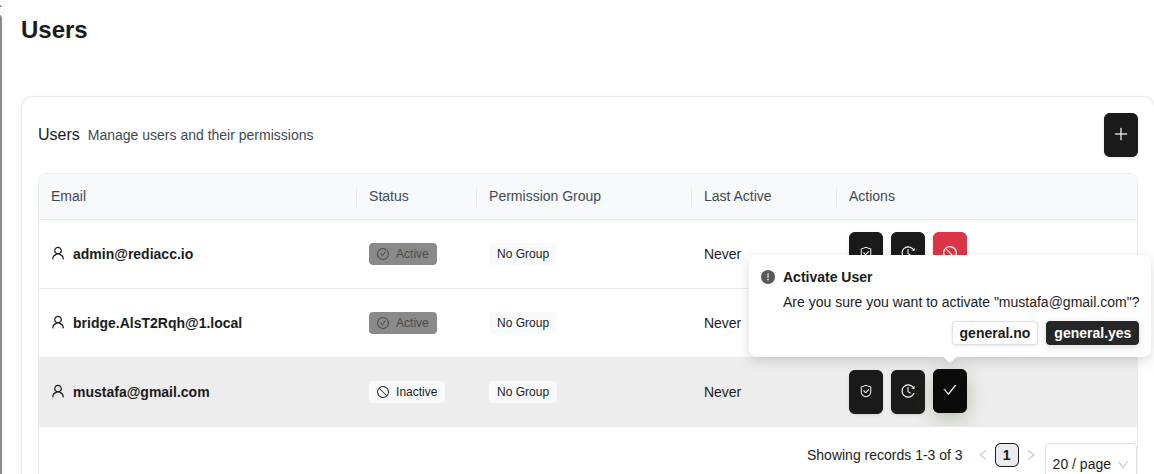 (Figure 13: Modal window for confirming user activation)
Tip: This action is reversible. You can deactivate the user in the same way.
2.1.4 User Trace
You can use the trace feature to monitor user activities.
- Select a user and click the gear icon in the actions column.
- Click the Trace option to open the user’s activity history.
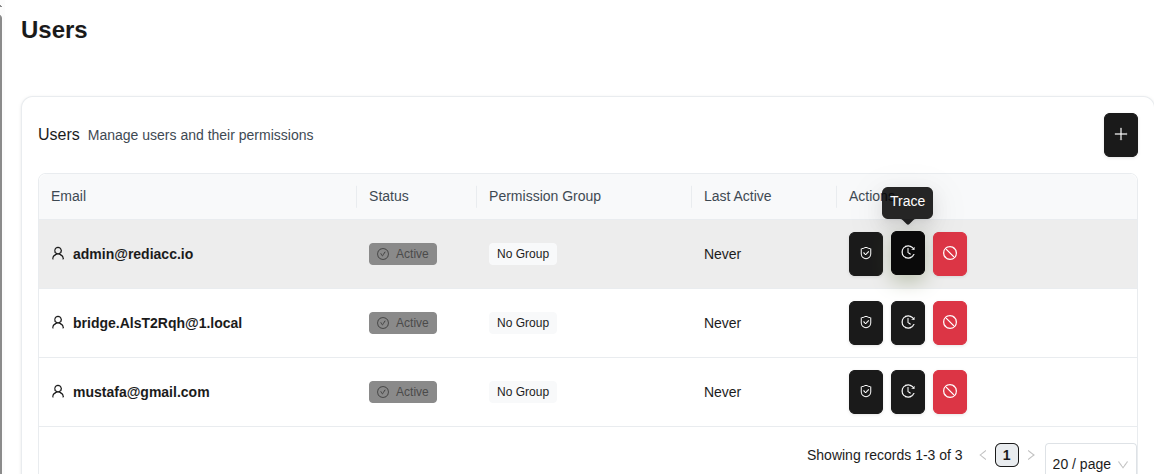 (Figure 14: User activity trace option)
- The user’s past activities are listed on the opened screen.
- Statistics are displayed at the top: Total Records, Viewed Records, Last Activity.
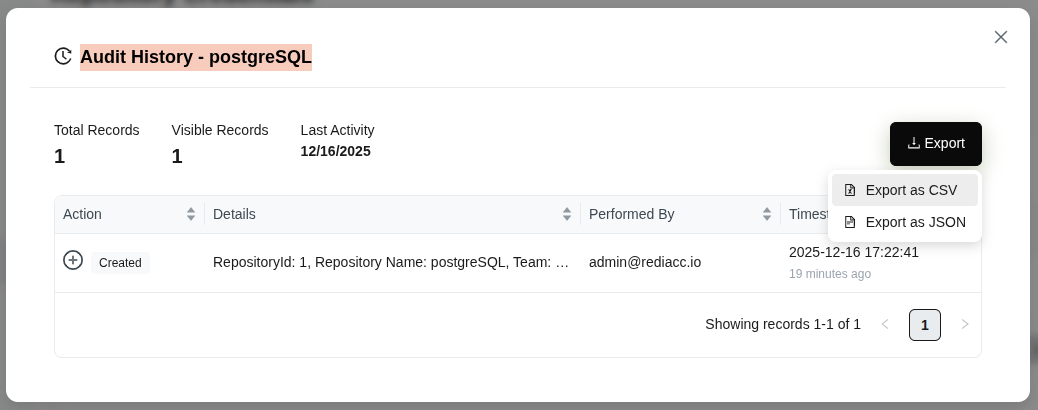
- Click the Export button and select format: Export as CSV or Export as JSON.
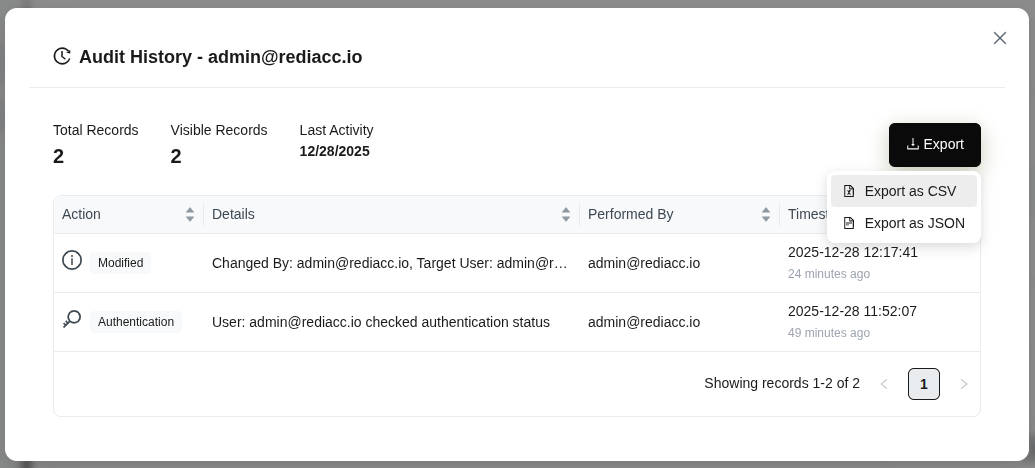 (Figure 15: User’s complete activity history - statistics, details, and Export options)
Tip: Regularly export audit data to maintain security and compliance records. CSV format can be opened in Excel.
2.2 Organization - Teams
Teams allow you to group users and provide bulk access to resources.
2.2.1 Creating Teams
- Go to Organization > Teams tab.
- Click the ”+” button.
- Enter your team name in the Team Name field.
- Fill in the SSH Private Key and SSH Public Key fields in the Vault Configuration section.
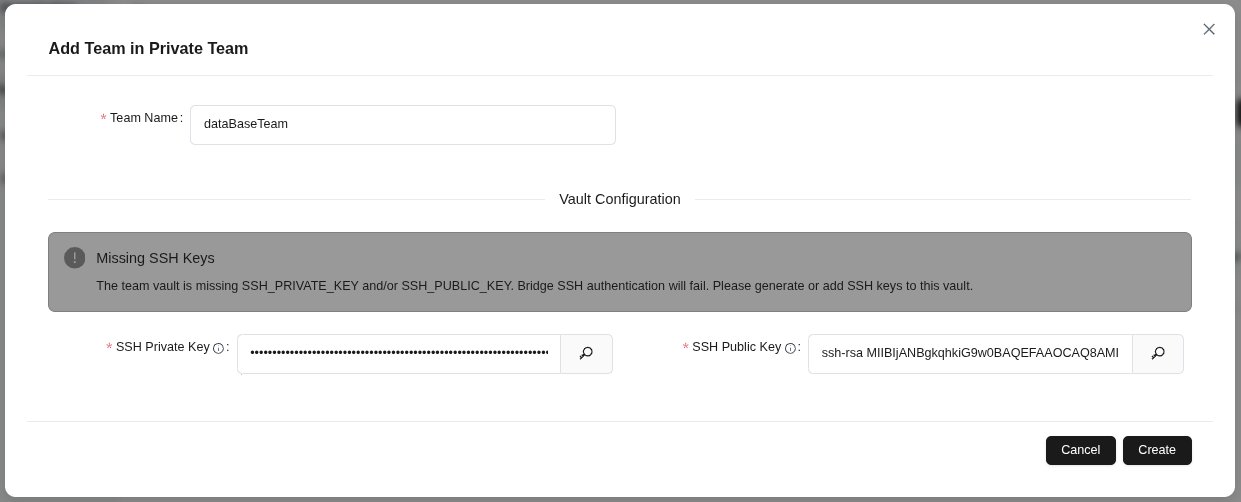 (Figure 16: Creating a new team within “Private Team”)
- Click the Create button to save the team.
Tip: SSH keys are required for Bridge SSH authentication. If you receive a missing key warning, provide both keys.
2.2.2 Team Editing
- Click the pencil icon next to the team you want to edit in the teams list.
- Change the team name in the Team Name field if needed.
- Update SSH keys in the Vault Configuration section.
- Click the Save button to apply changes.
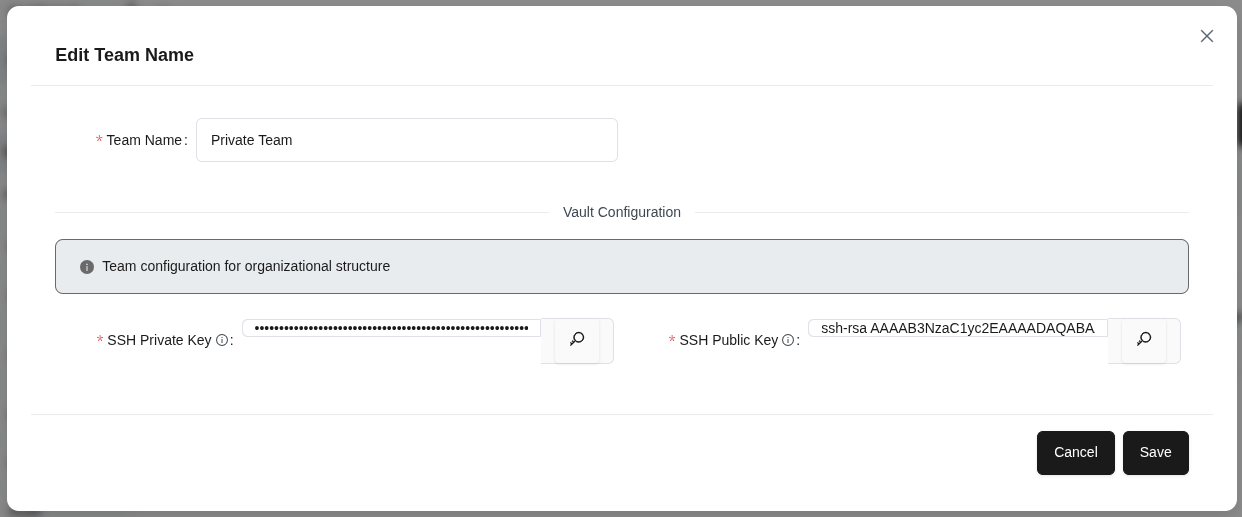 (Figure 17: Editing an existing team’s information)
Tip: Team configuration is used for organizational structure. Changes take effect for all team members.
2.2.3 Team Members Management
- Select a team and click the user icon.
- View members already assigned to the team in the Current Members tab.
- Switch to the Add Member tab.
- Enter an email address or select a user from the dropdown.
- Click the ”+” button to add the member to the team.
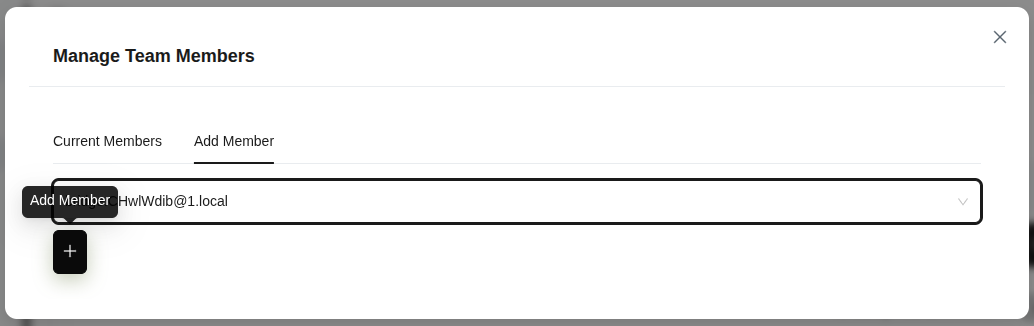 (Figure 18: Team members management panel)
Tip: You can assign the same member to multiple teams.
2.2.4 Team Trace
- Select the team you want to trace.
- Click the clock/history icon.
- Review Total Records, Viewed Records, and Last Activity counts in the Audit History - {{name}} modal.
- Click the Export button to export in Export as CSV or Export as JSON format.
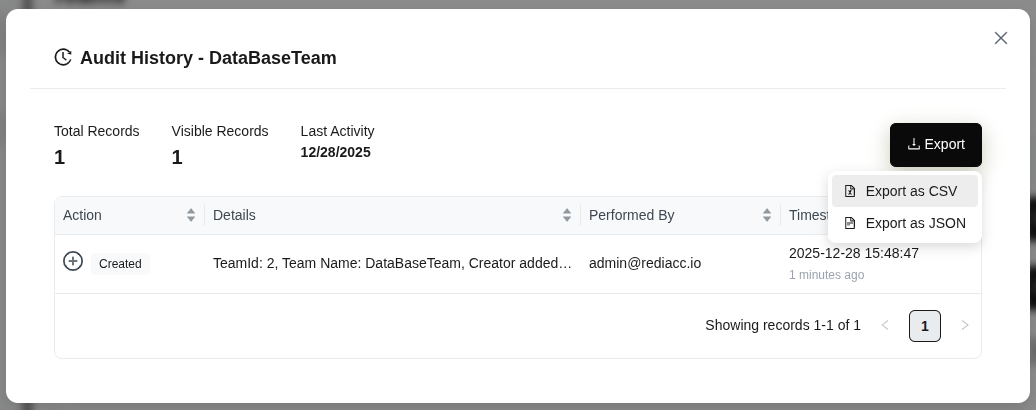 (Figure 19: Viewing team audit history)
Tip: Audit history is important for compliance and security control.
2.2.5 Team Deletion
- Click the trash can (red) icon next to the team you want to delete.
- Verify the team name is correct in the confirmation dialog.
- Click the Yes button.
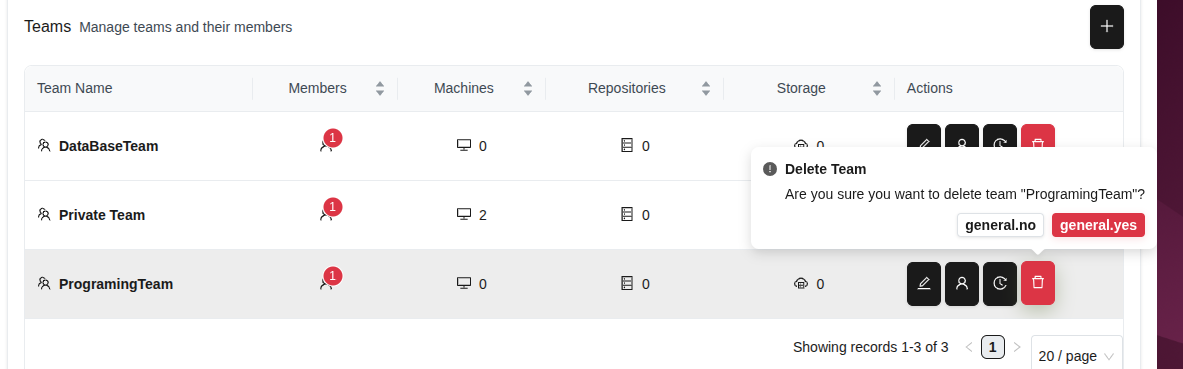 (Figure 20: Team deletion confirmation)
Warning: Team deletion is irreversible. Check if there is important data in the team before deleting.
2.3 Organization - Access Control
Access control allows you to centrally manage user permissions by creating permission groups.
2.3.1 Creating Permission Groups
- Go to Organization > Access tab.
- Click the ”+” button.
- Enter a meaningful name in the Enter group name field.
- Click the Confirm button to create the group.
 (Figure 21: Creating a new Permission Group)
Tip: Permission groups are used to organize users with similar permissions. Keep group names descriptive (e.g., “Admin”, “Read Only”, “Repository Manager”).
2.3.2 Permission Management
- Select a Permission Group and click the Manage Permissions option.
- View the group’s access rights in the Current Permissions tab.
- You can revoke a permission by clicking the red Delete button next to each action.
- Click the Add Permissions tab to add new permissions to the group.
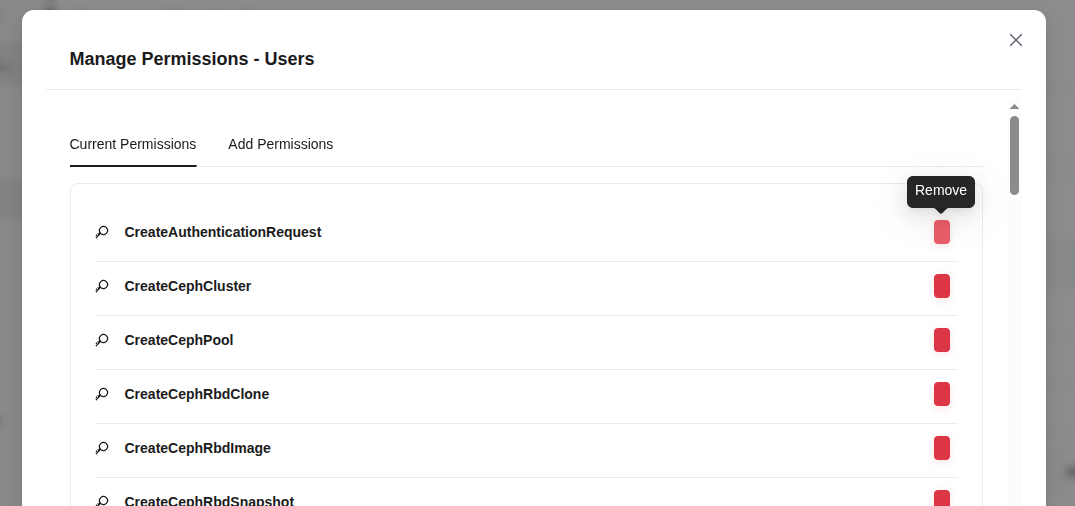 (Figure 22: Managing Permissions for Permission Group)
Tip: Grant permissions based on the principle of least privilege. Regularly review and remove unnecessary permissions.
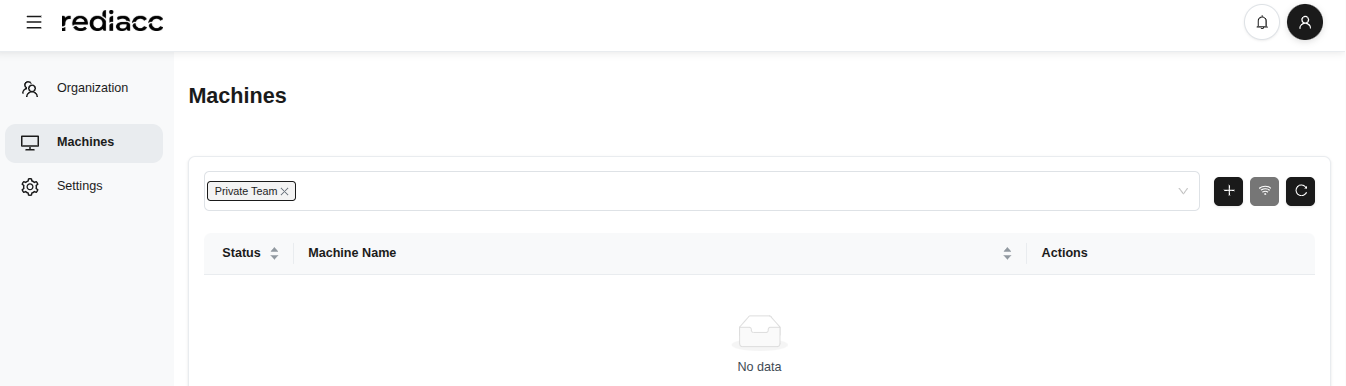
2.4 Machines
The Machines section allows you to manage your servers and repository resources.
2.4.1 Adding Machines
- Go to the Machines tab from the left menu.
- Click the Add Machine button in the top right corner.
 (Figure 23: Machines management home page)
- Fill in the form that opens:
- Machine Name: Enter a unique name (e.g., “server-01”)
- IP Address: Enter the machine IP address (e.g., 192.168.111.11)
- Datastore Path: Specify the storage directory (e.g., /mnt/rediacc)
- Username: Enter the SSH username
- SSH Port: Enter the port number (default: 22)
- SSH Password: Enter the password (optional)
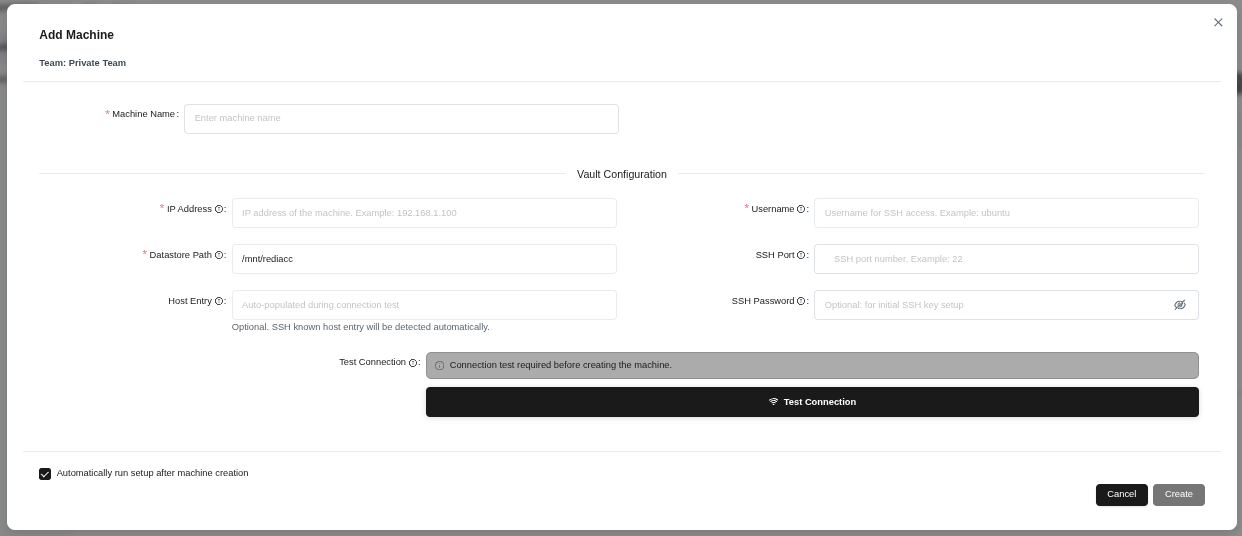 (Figure 24: New machine addition form - machine name, network settings, SSH credentials)
- Click the Test Connection button to verify the connection.
- After the test is successful, click the Create button.
Tip: If “Automatically start setup after machine creation” option is checked, the machine will automatically perform additional setup steps.
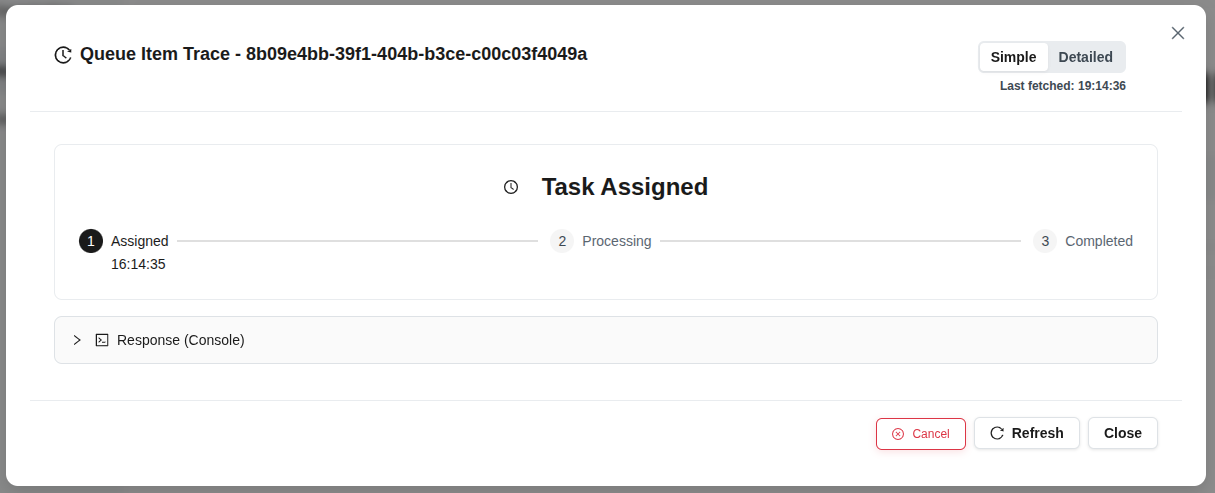
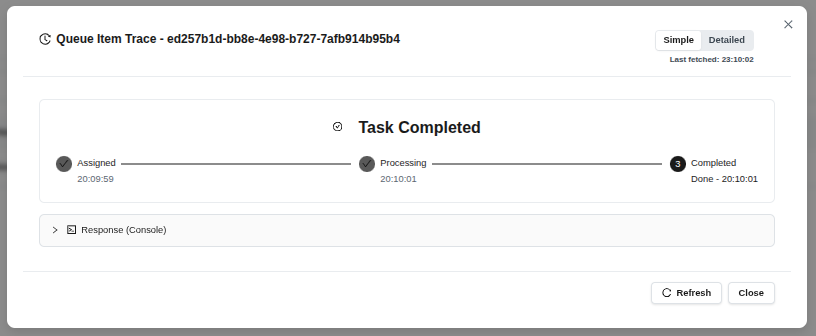 (Figure 25: Task tracking window after machine is successfully created)
- Watch the stages: Assigned → Processing → Completed
- Click the Close button to close the operation.
Tip: Click the “Refresh” button to manually check the latest status.
2.4.2 Connectivity Test
You can check the connection status of existing machines.
- Click the Connectivity Test button.
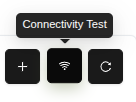 (Figure 26: Connectivity Test button in machine actions toolbar)
- See the list of machines to be tested.
- Click the Run Test button.
- Successful results are shown in green, failures in red.
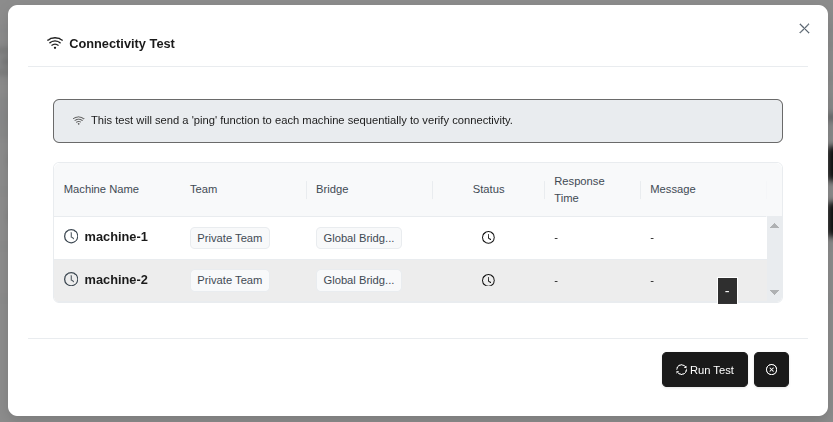 (Figure 27: Connectivity test form - ping function for selected machines)
Tip: If the test fails, check the machine IP address and SSH settings.
2.4.3 Refreshing Machine List
Click the Refresh button to update the machine list.
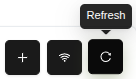 (Figure 28: Refresh button in machine actions toolbar)
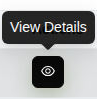
2.4.4 Machine Details
- Select the machine whose details you want to see.
- Click the eye icon button (View Details).
 (Figure 29: Eye icon in machine actions column)
- The machine details panel opens on the right side:
- Hostname: Machine name
- Uptime: Running time
- Operating System: OS and version
- Kernel Version: Kernel version
- CPU: Processor information
- System Time: System clock
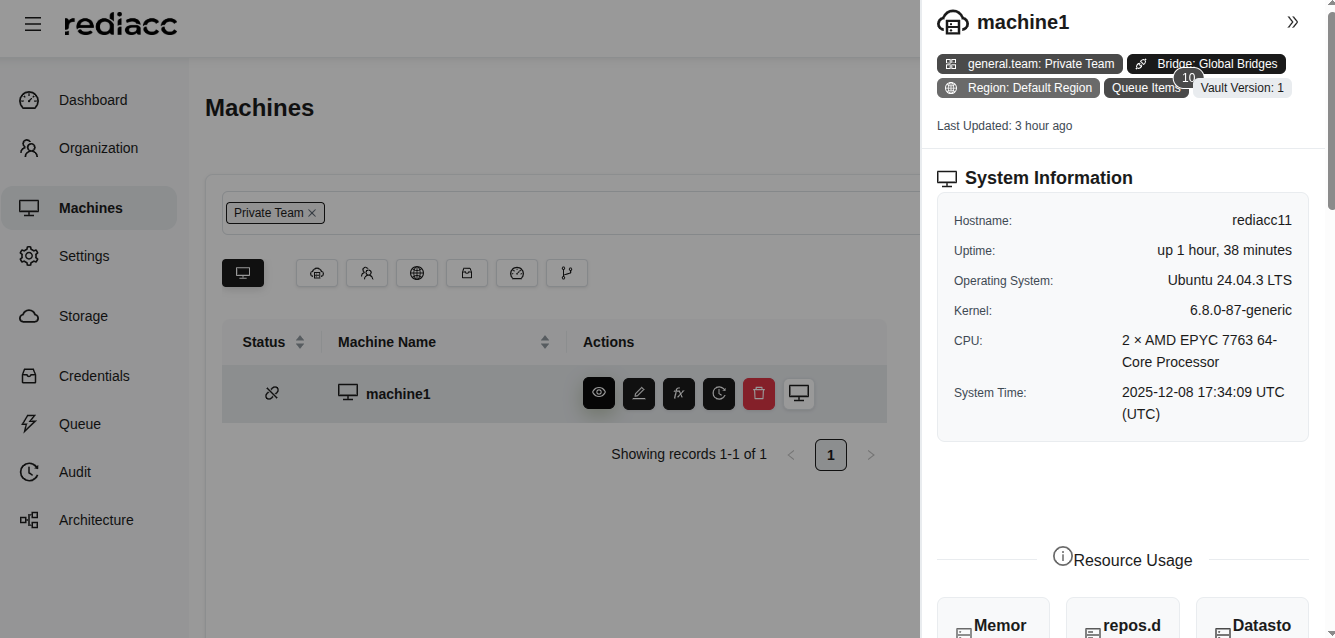 (Figure 30: Machine detail panel - hostname, uptime, OS, kernel, CPU information)
Tip: Regularly review this information to check OS compatibility and resource availability.
2.4.5 Machine Editing
- Select the machine you want to edit.
- Click the pencil icon button (Edit).
 (Figure 31: Pencil icon in machine actions column)
- Make the necessary changes.
- Click the Test Connection button.
- When the connection is successful, click the Save button.
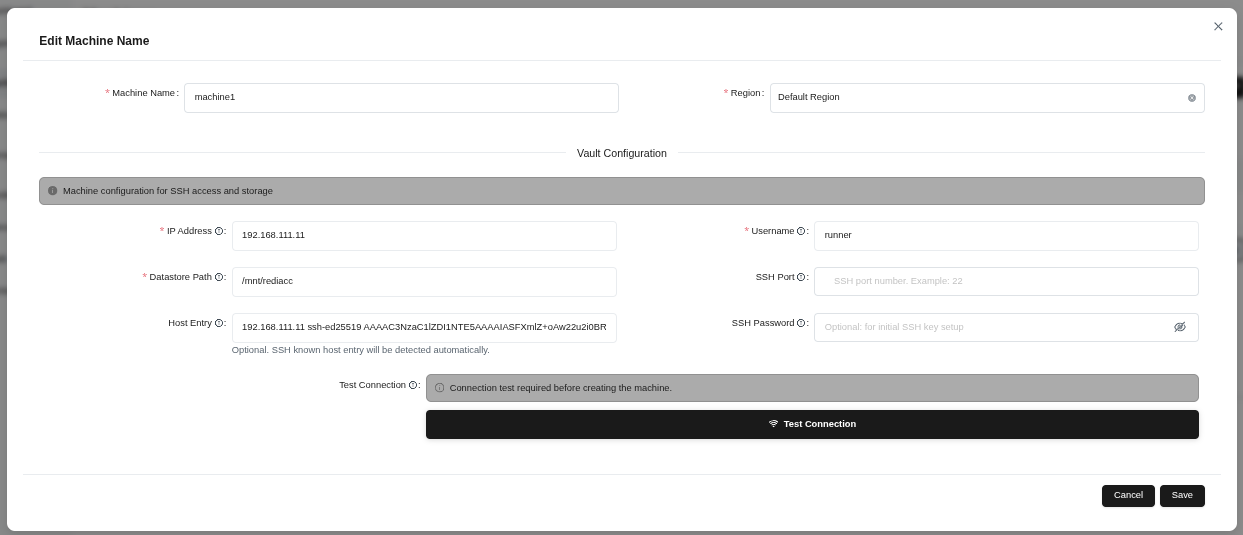 (Figure 32: Machine editing form - machine name, region, and vault configuration)
Tip: Always run “Test Connection” after changing critical settings.
2.4.6 Machine Trace
- Select the machine and click the clock icon button (Trace).
 (Figure 33: Clock icon in machine actions column)
- Review operations in the audit history window:
- Action: Type of operation performed
- Details: Changed fields
- Performed By: User who performed the action
- Timestamp: Date and time
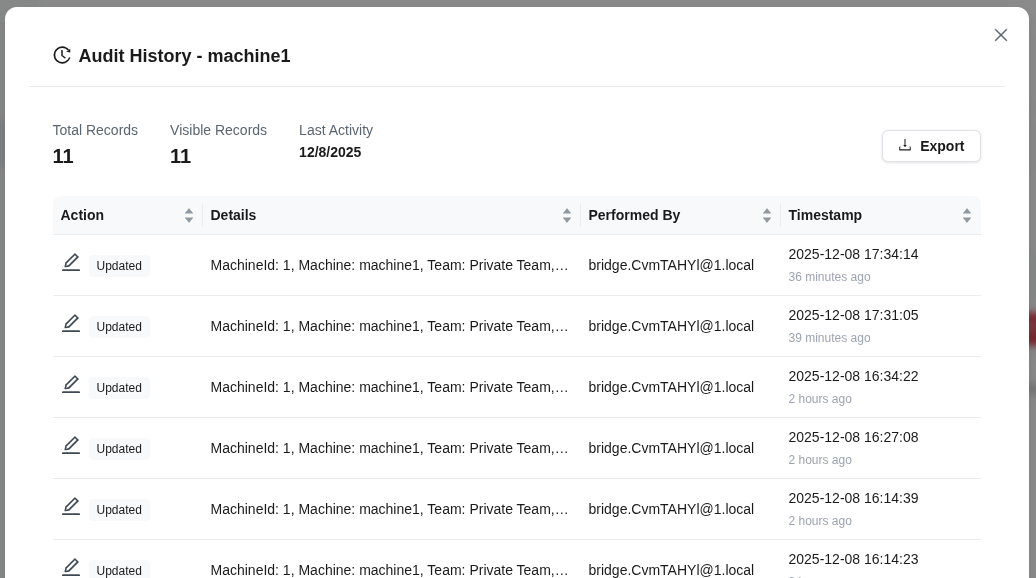 (Figure 34: Audit history - list of all changes)
Tip: Click the Timestamp column to view changes in chronological order.
2.4.7 Machine Deletion
- Select the machine you want to delete.
- Click the trash can icon button (Delete).
 (Figure 35: Trash can icon in machine actions column)
- Click the Delete button in the confirmation window.
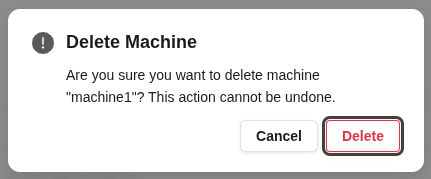 (Figure 36: “Are you sure you want to delete this machine?” confirmation window)
Warning: When a machine is deleted, all repository definitions on it are also removed. This action is irreversible.
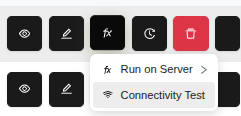
2.4.8 Remote Operations
You can perform various remote operations on machines.
- Select the machine and click the Remote button.
- See options in the dropdown menu:
- Run on Server: Execute function on machine
- Test Connection: Ping the machine
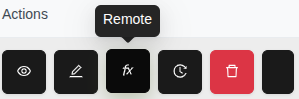 (Figure 37: Remote button - function execution menu on selected machine)
Tip: Use “Test Connection” option to verify the machine is accessible before running functions.
Setup
- Select the Run on Server option.
- Find the Setup function in the Available Functions list.
- Click on the function name to select it.
 (Figure 38: Setup function - prepares the machine with required tools and configurations)
Tip: It’s recommended to run the “setup” function first when setting up a new machine.
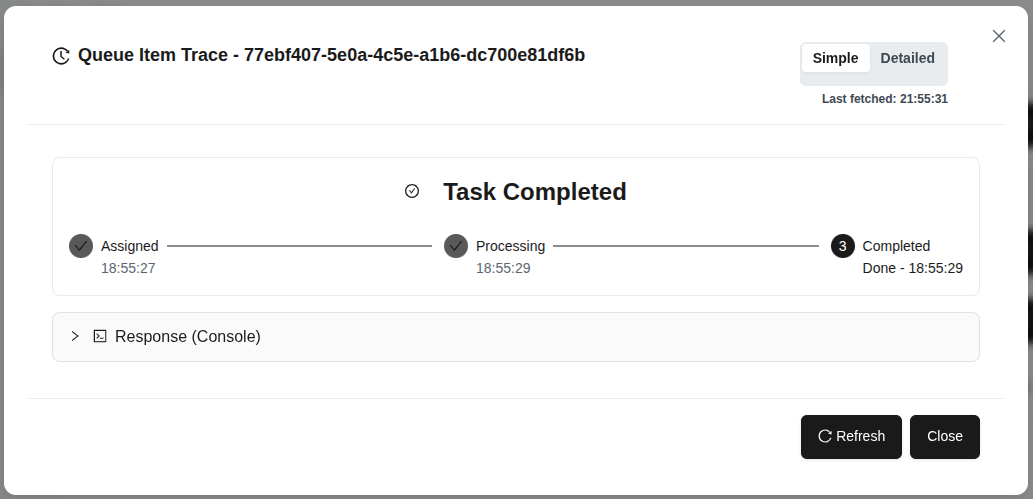
Connection Check (Hello)
- Select Run on Server > Hello function.
- Click the Add to Queue button.
 (Figure 39: Hello function - simple test function, returns hostname)
- Watch the results in the task tracking window.
- See the machine’s output in the Response (Console) section.
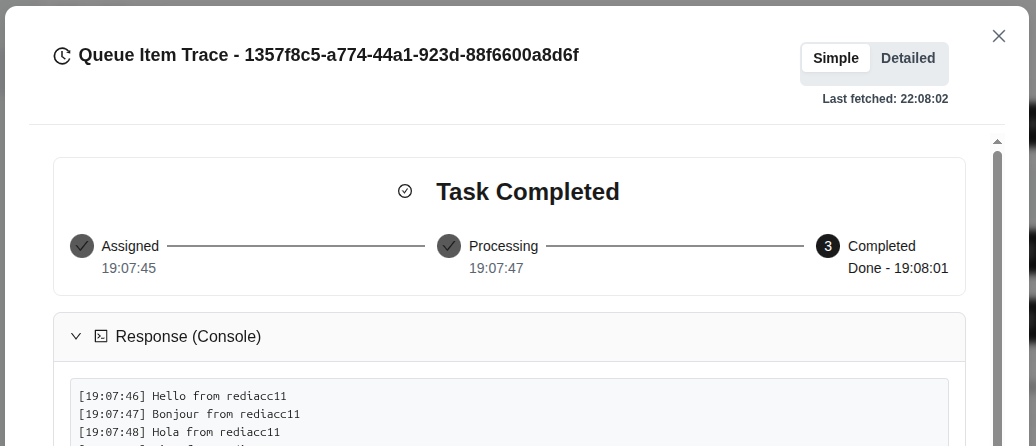 (Figure 40: Hello function completed successfully - hostname response)
Tip: The hello function is ideal for verifying machine connectivity.
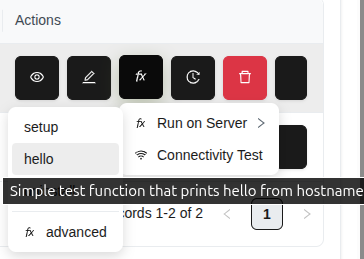
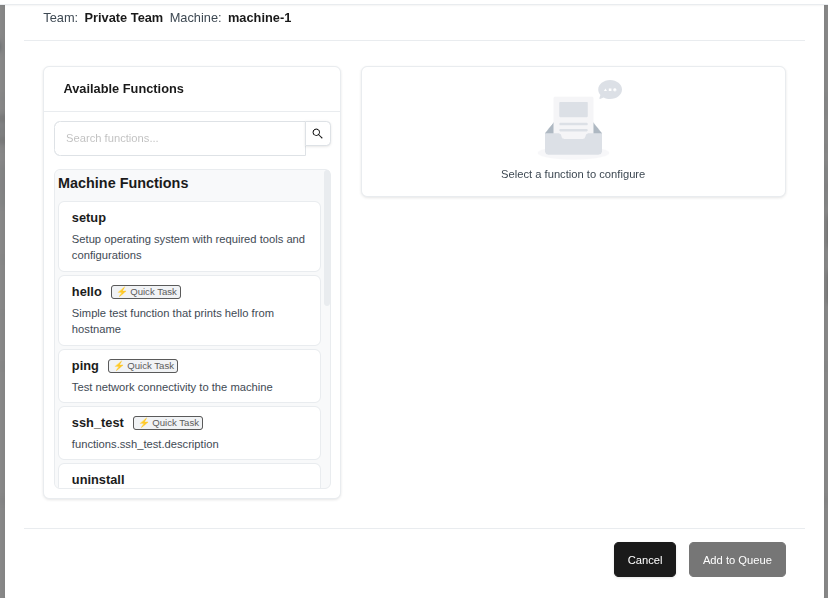
Advanced Operations
- Follow the Remote > Run on Server > Advanced path.
- See available functions: setup, hello, ping, ssh_test, uninstall
- Select the required function and click the Add to Queue button.
 (Figure 41: Advanced option - advanced functions list)
Tip: Make sure machine setup is complete before using Advanced functions.
Quick Connectivity Test
 (Figure 42: Test Connection option from Remote menu)
Tip: If the machine has SSH or network issues, you can quickly identify problems with this test.
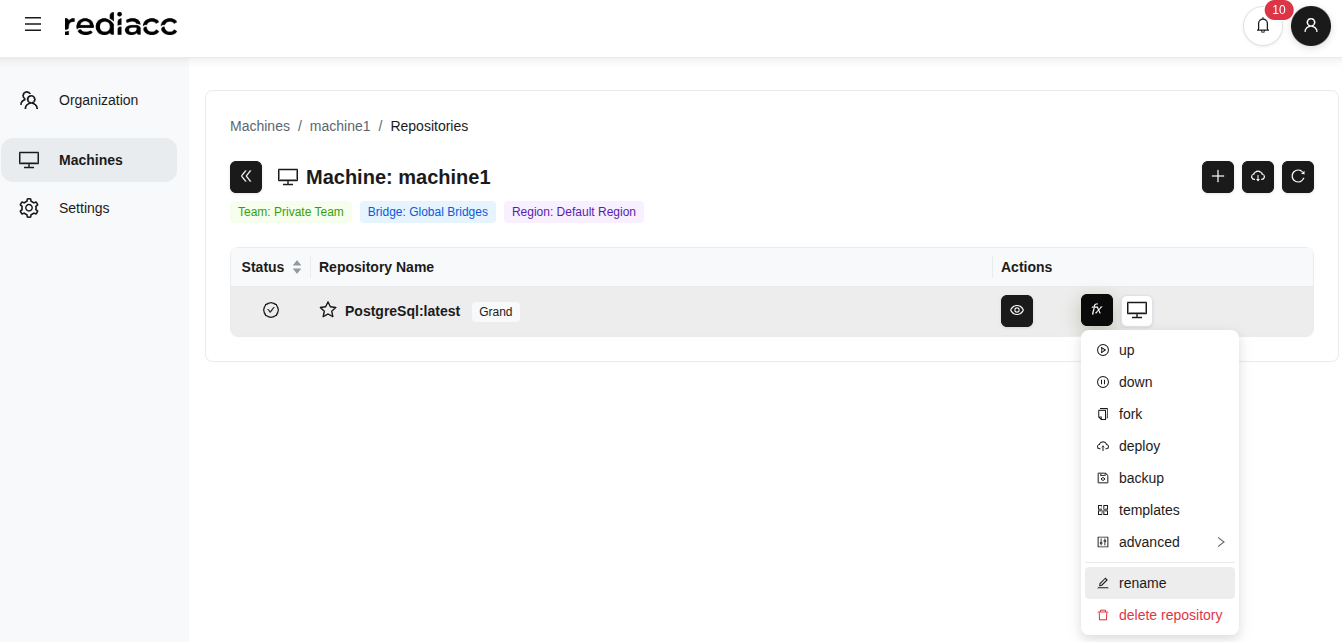
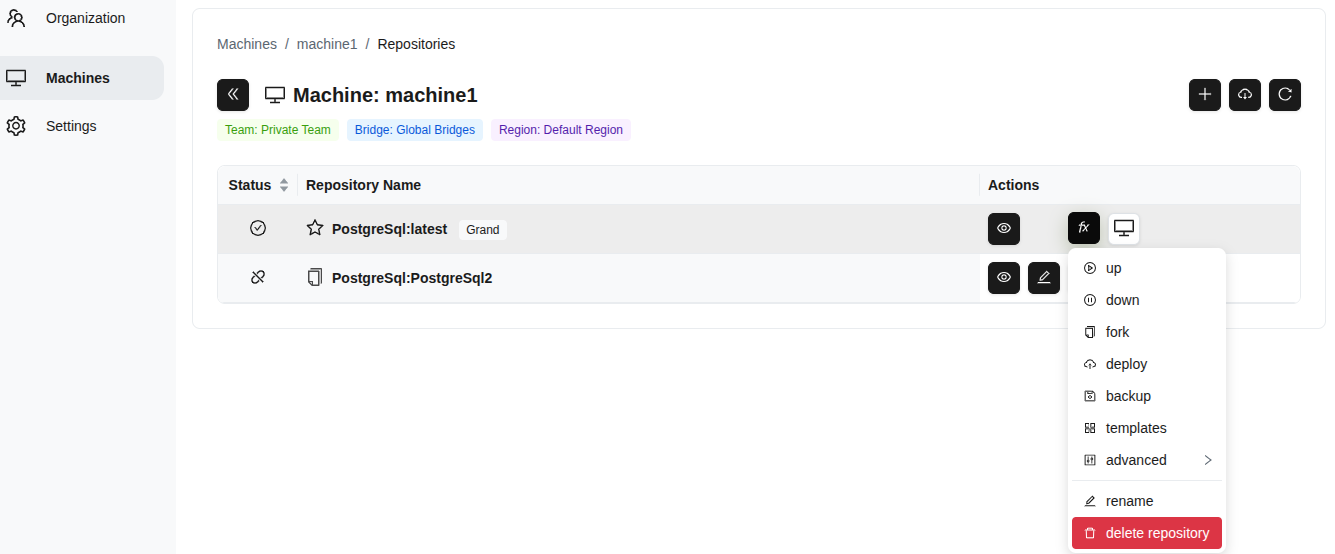
2.5 Repository Creation and Operations
Repositories are the fundamental units where your backup data is stored.
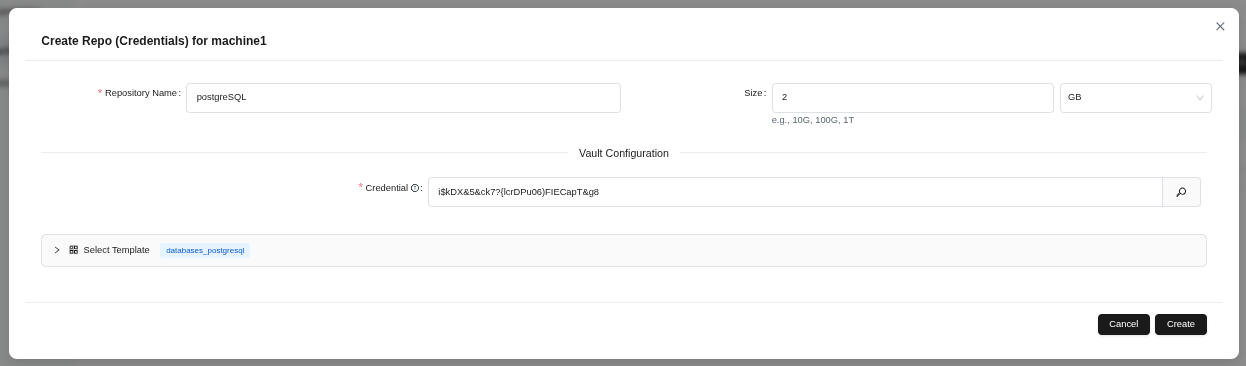
2.5.1 Creating Repositories
- Select a machine from the Machines tab.
- Click the Create Repository button in the top right corner.
 (Figure 43: Machine repository management screen - Create Repository button)
- Fill in the form:
- Repository Name: Enter the repository name (e.g., postgresql)
- Size: Enter the repository size (e.g., 2GB)
- Repository GUID: View the automatically generated credential
- Select Template: Choose a template (e.g., databases_postgresql)
 (Figure 44: Repository creation form - repository name, size, and template selection)
- Click the Create button.
Tip: Credential ID is automatically generated, manual modification is not recommended.
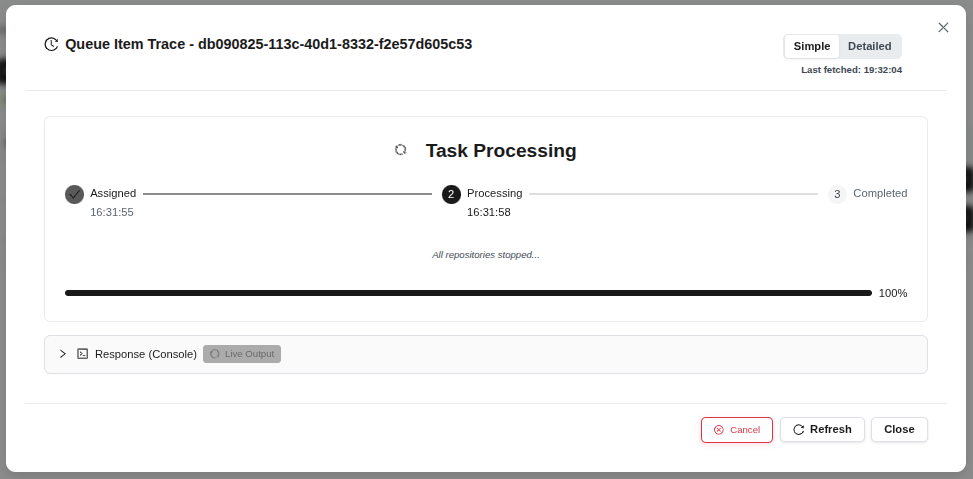
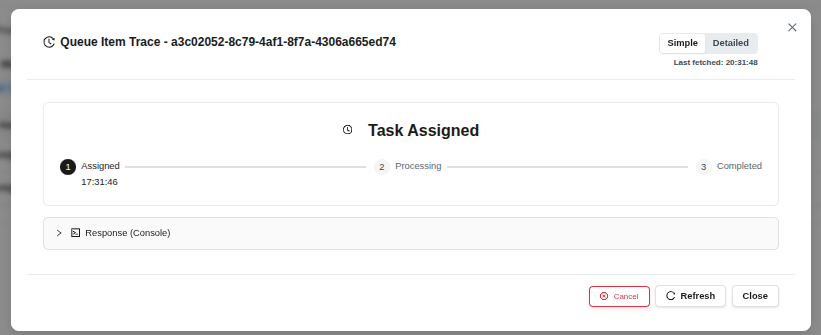
- Watch the stages in the task tracking window: Assigned → Processing → Completed
 (Figure 45: Repository creation queued - task monitoring)
- Click the Close button.
Tip: The task typically completes within 1-2 minutes.
 (Figure 46: Created repository appears in the list)
2.5.2 Repository Fork
You can create a new repository by copying an existing one.
- Select the repository you want to copy.
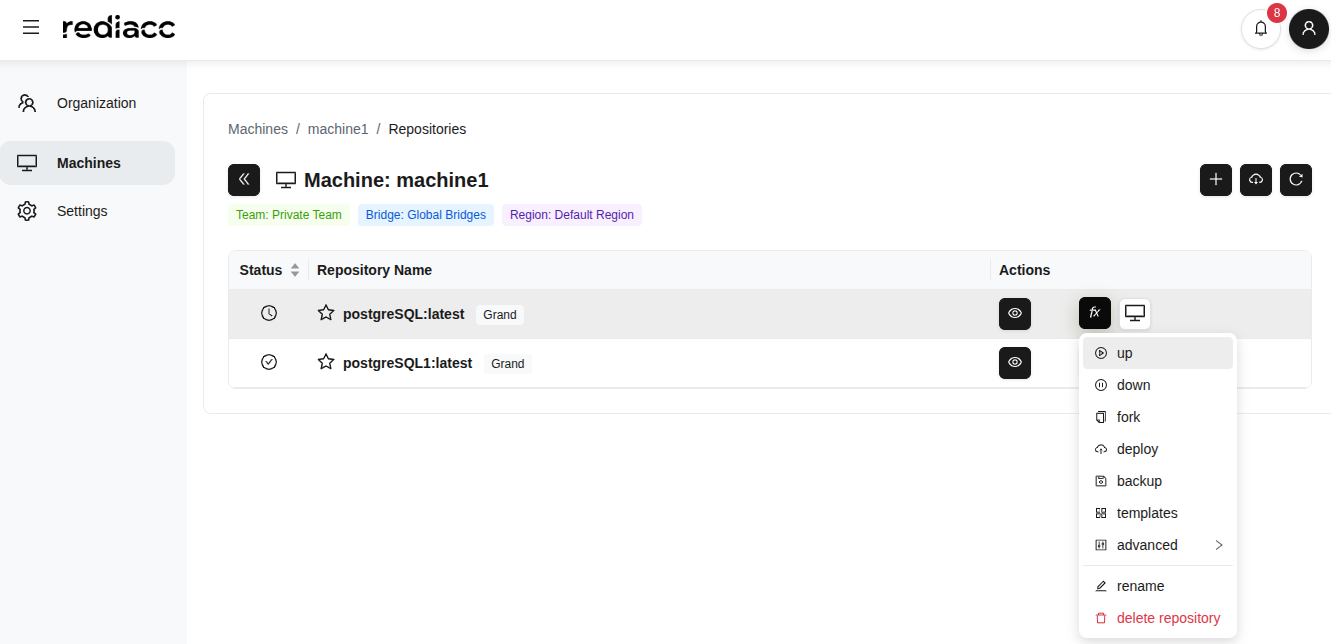
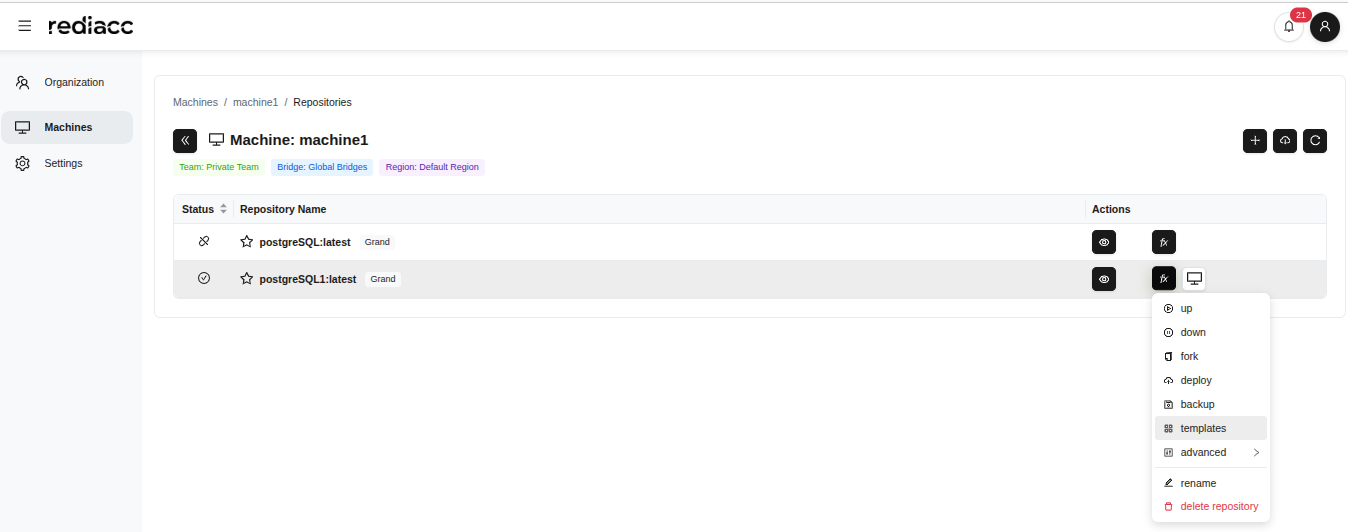
- Click the fx (function) menu.
- Click the fork option.
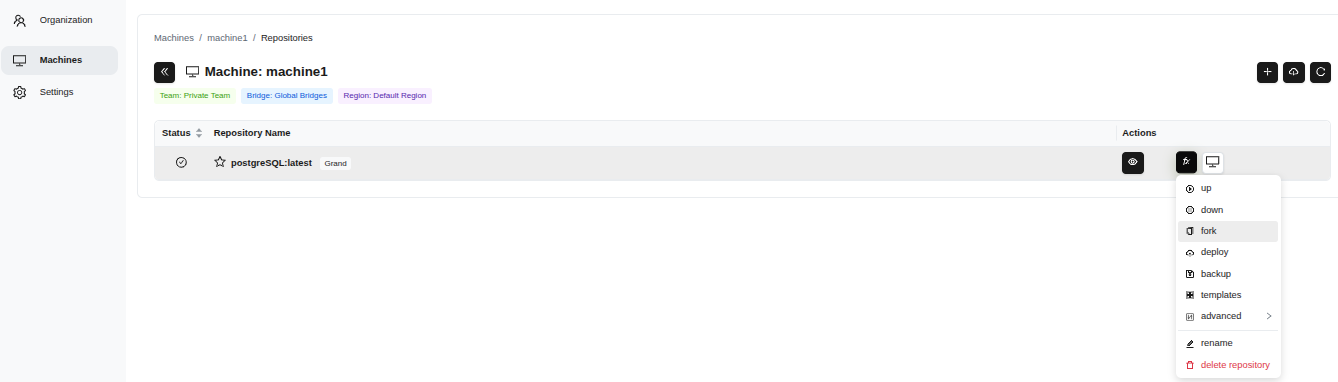 (Figure 47: fx menu on the right side - repository operations)
- Enter a new tag in the Tag field (e.g., 2025-12-06-20-37-08).
- Click the Add to Queue button.
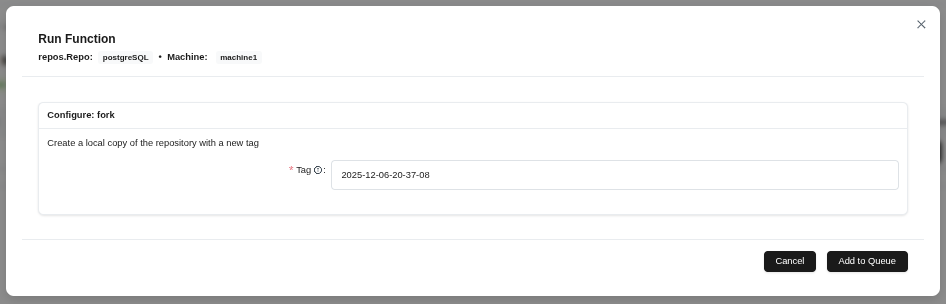 (Figure 48: Specify the new tag for the repository in the fork operation)
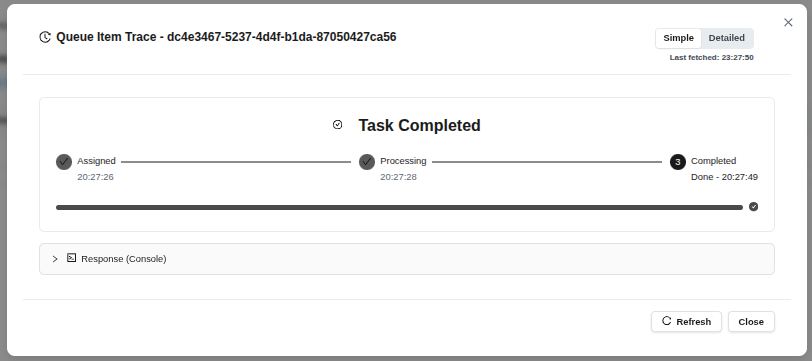
- Wait for the Completed message and click the Close button.
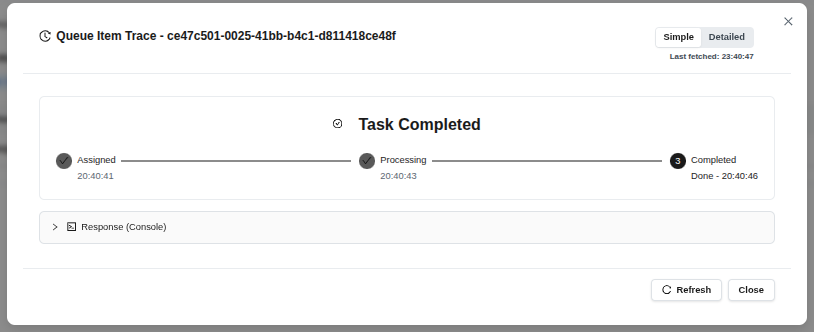 (Figure 49: Fork operation completed successfully)
Tip: Creating tags in the default date-time format is good practice. The fork operation does not affect the original repository.
2.5.3 Repository Up
To activate the repository:
- Select the repository and follow the fx > up path.
 (Figure 50: “up” option from fx menu - starting the repository)
- Wait for the Completed message.
 (Figure 51: Repository startup completed)
Tip: The “Up” operation starts the repository’s defined Docker services.
2.5.4 Repository Down
To stop an active repository:
- Select the repository and follow the fx > down path.
 (Figure 52: “down” option from fx menu - shutting down the repository)
- Wait for the Completed message.
 (Figure 53: Repository shutdown completed)
Tip: The “Down” operation safely shuts down the repository. No data is lost, only services are stopped.
2.5.5 Deploy
To deploy the repository to a different location:
- Select the repository and follow the fx > deploy path.
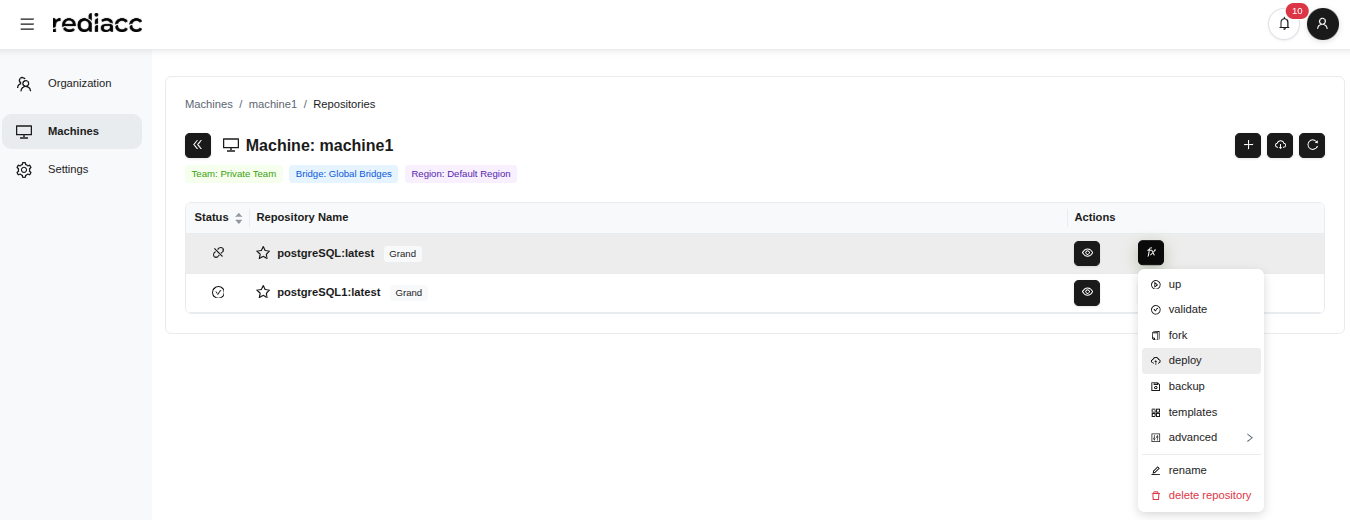 (Figure 54: “deploy” option from fx menu)
- Enter the version to deploy in the Tag field.
- Select target machines in the Target Machines field.
- Check the Override existing file option (if applicable).
- Click the Add to Queue button.
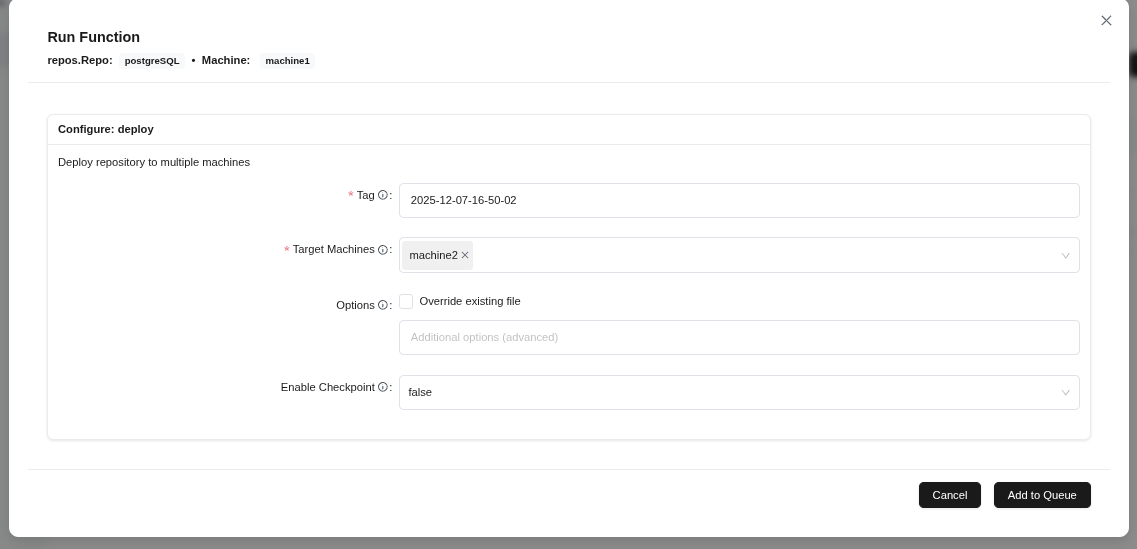 (Figure 55: Configuring deploy operation - tag, target machines, and options)
- Wait for the Completed message.
 (Figure 56: Repository deployment completed)
Tip: After the deploy operation completes, you can run the “up” command to start the repository on target machines.
2.5.6 Backup
To backup the repository:
- Select the repository and follow the fx > backup path.
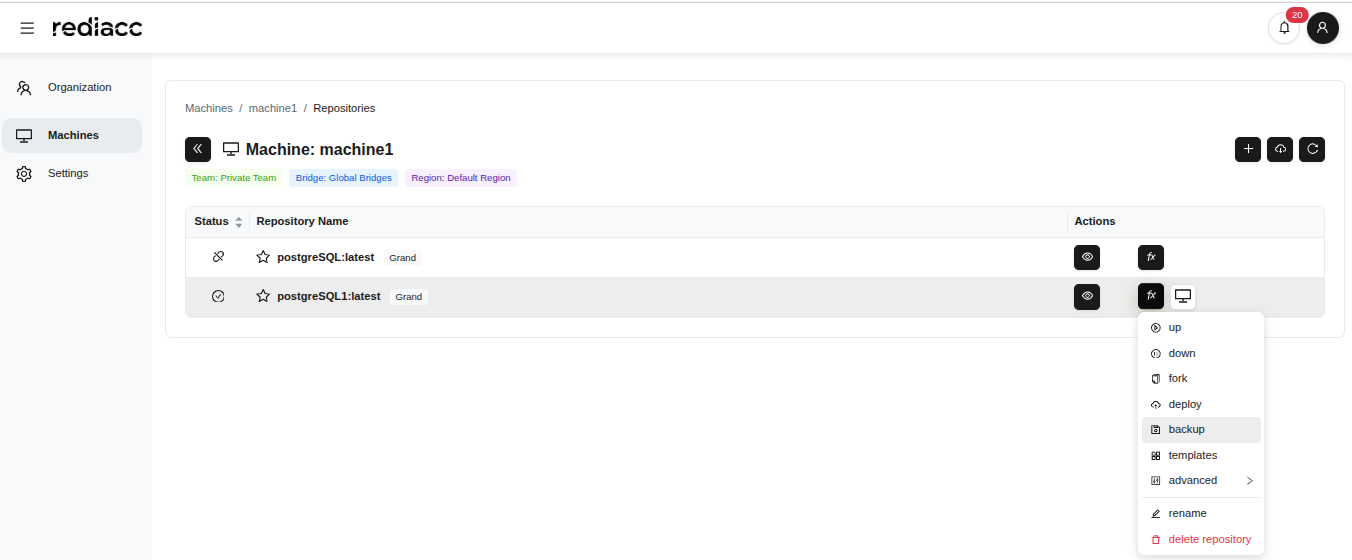 (Figure 57: “backup” option from fx menu)
- Fill in the form:
- Tag: Enter a descriptive name (e.g., backup01012025)
- Target Storage Systems: Select the backup location
- Override existing file: Enable or disable the option
- Enable Checkpoint: Review the setting
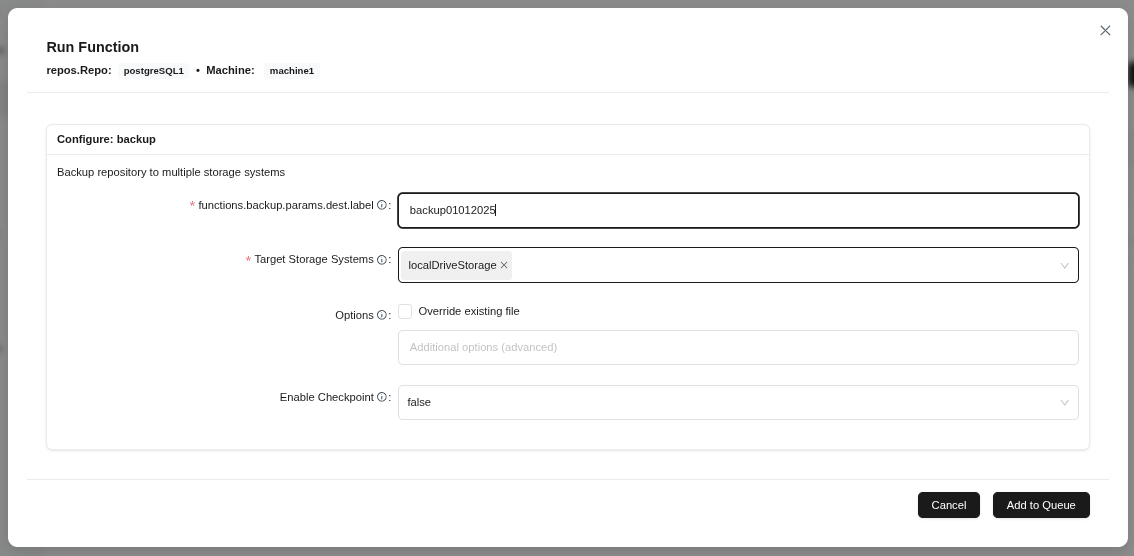 (Figure 58: Backup configuration form - target, filename, and options)
- Click the Add to Queue button.
Tip: Use a descriptive name for the backup tag. Consider enabling checkpoint for large repositories.
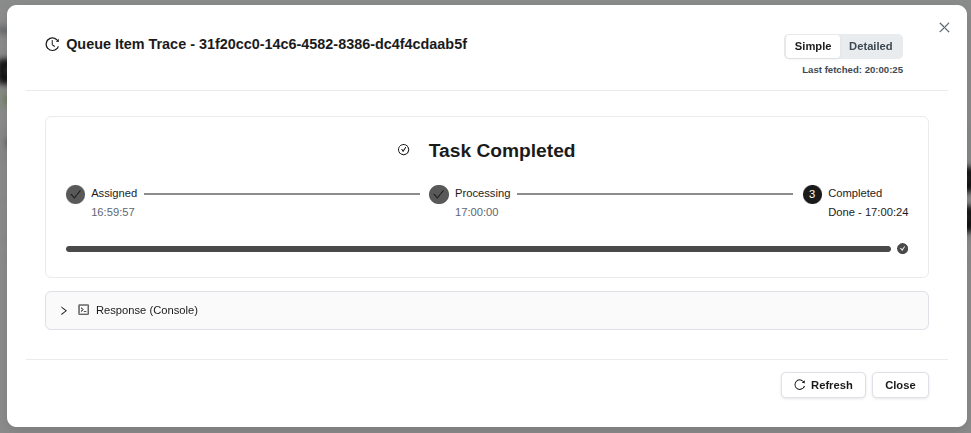
- Wait for the Completed message.
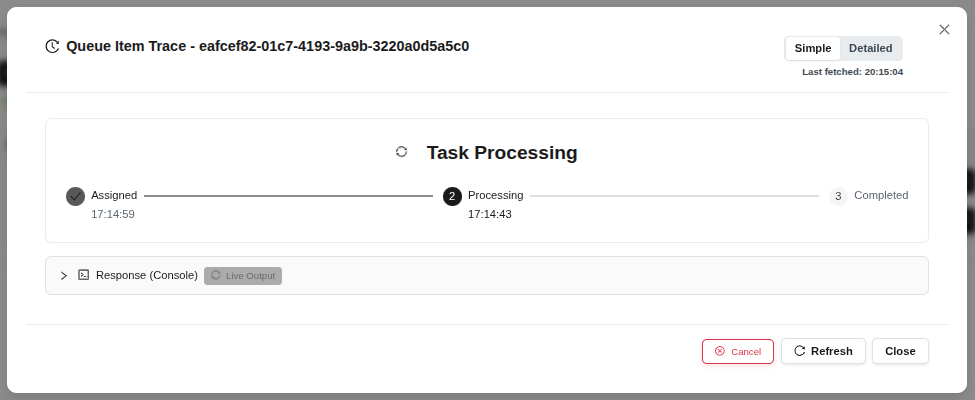 (Figure 59: Backup task completed successfully)
Tip: Wait patiently before reaching completed status; large backups may take several minutes.
2.5.7 Template Application
To apply a new template to the repository:
- Select the repository and follow the fx > Select Template path.
 (Figure 60: “Templates” option from fx menu)
- Filter templates by typing in the search box.
- Click on the desired template to select it (selected template is highlighted with a bold border).
- Click the Add to Queue button.
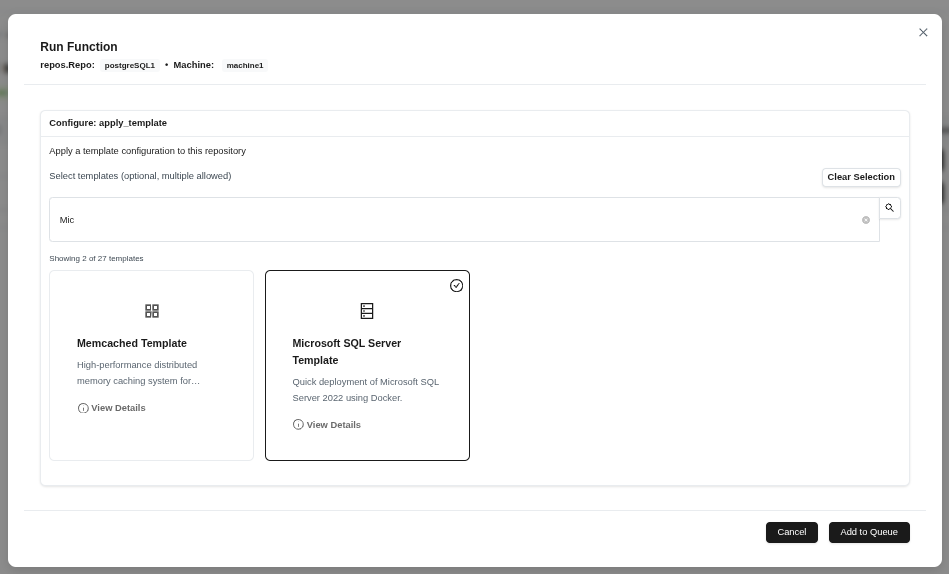 (Figure 61: Searching and selecting available templates)
Tip: Use the search box to quickly find templates. Use “View Details” to learn about template features.
- Wait for the Completed message.
 (Figure 62: Template application completed successfully)
2.5.8 Unmount
To disconnect the repository:
- Select the repository and follow the fx > Advanced > unmount path.
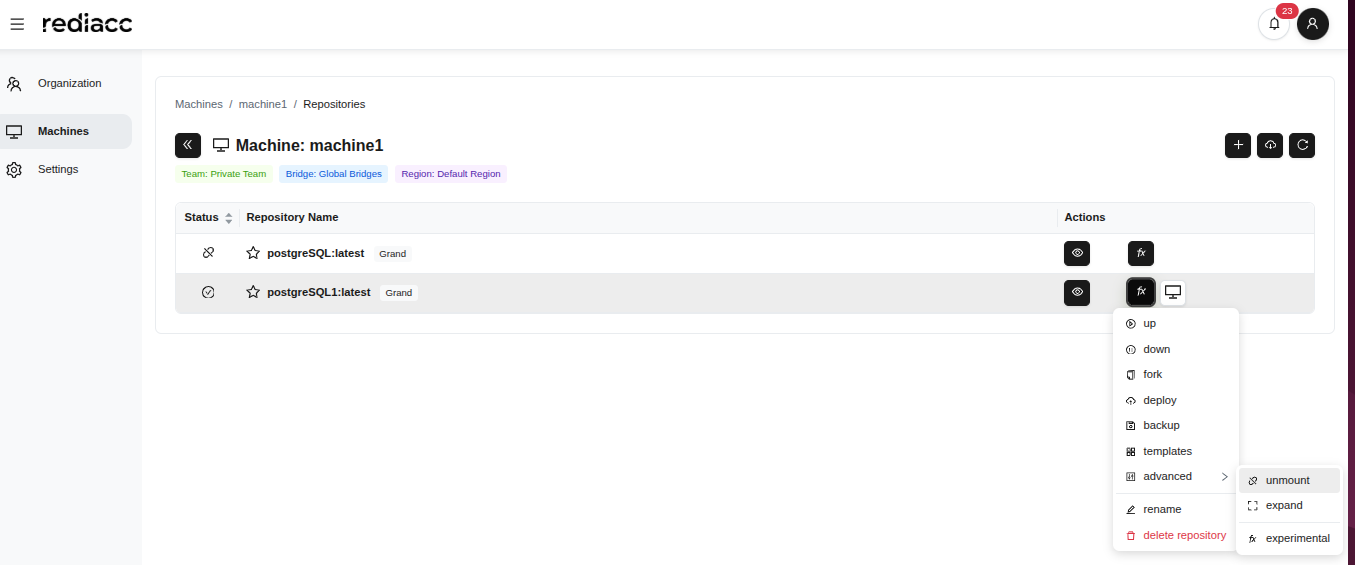 (Figure 63: “Unmount” option in the advanced menu)
- Wait for the Completed message.
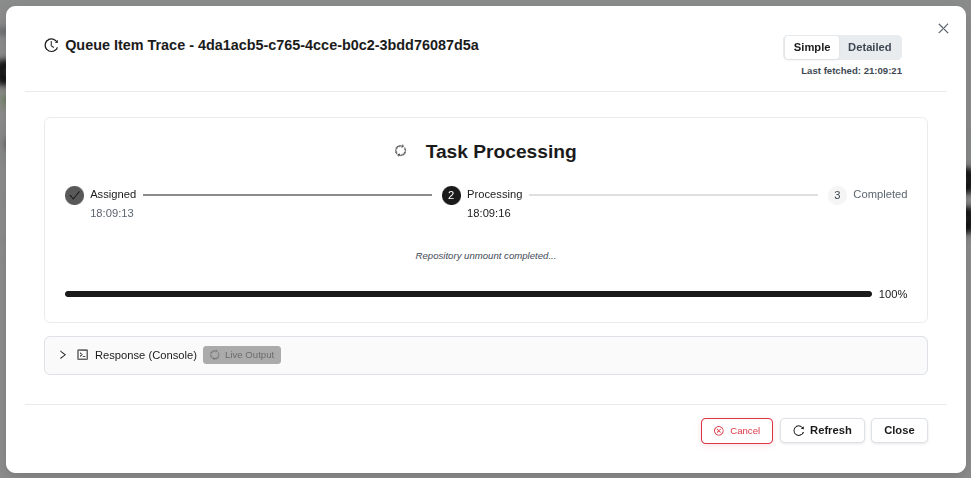 (Figure 64: Unmount operation completed)
Tip: Make sure there are no active operations on the repository before unmounting. After unmounting, the repository becomes inaccessible.
2.5.9 Expand
To increase the repository size:
- Select the repository and follow the fx > Advanced > expand path.
 (Figure 65: “Expand” option in the advanced menu)
- Enter the desired size in the New Size field.
- Select the unit from the dropdown on the right (GB, TB).
- Click the Add to Queue button.
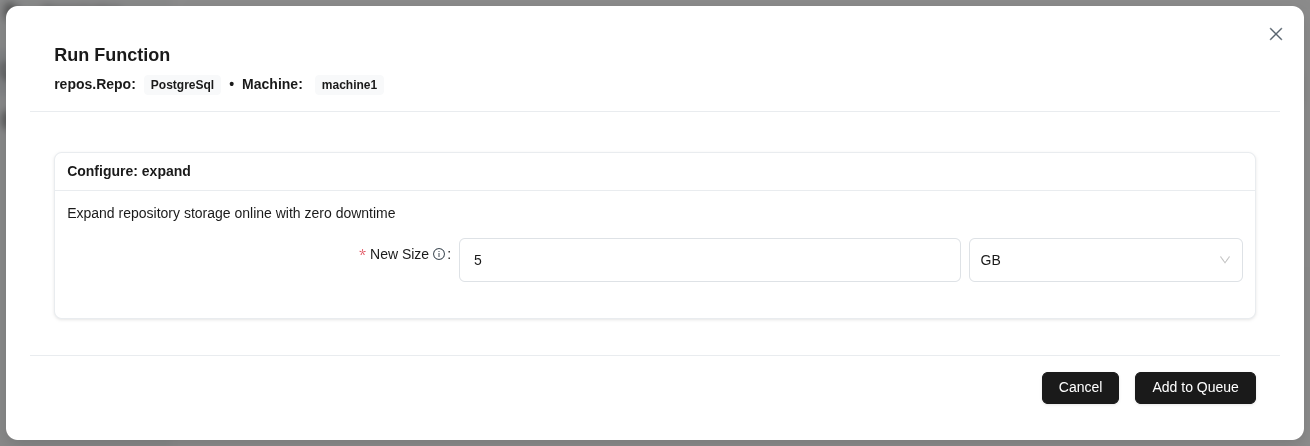 (Figure 66: New size parameter to increase repository size)
Tip: Do not enter a value smaller than the current size. Service is not interrupted during repository expansion.
- Wait for the Completed message.
 (Figure 67: Repository expansion completed)
2.5.10 Rename
To change the repository name:
- Select the repository and follow the fx > Rename path.
 (Figure 68: “Rename” option from fx menu)
- Enter the new repository name.
- Click the Save button.
 (Figure 69: Dialog for entering new repository name)
Tip: Repository names should be meaningful to reflect the repository type and purpose. Avoid special characters.
2.5.11 Repository Deletion
To permanently delete the repository:
- Select the repository and follow the fx > Delete Repository path.
 (Figure 70: “Delete Repository” option from fx menu - red)
- Click the Delete button in the confirmation window.
Warning: Repository deletion is irreversible. Make sure repository data is backed up before deleting.
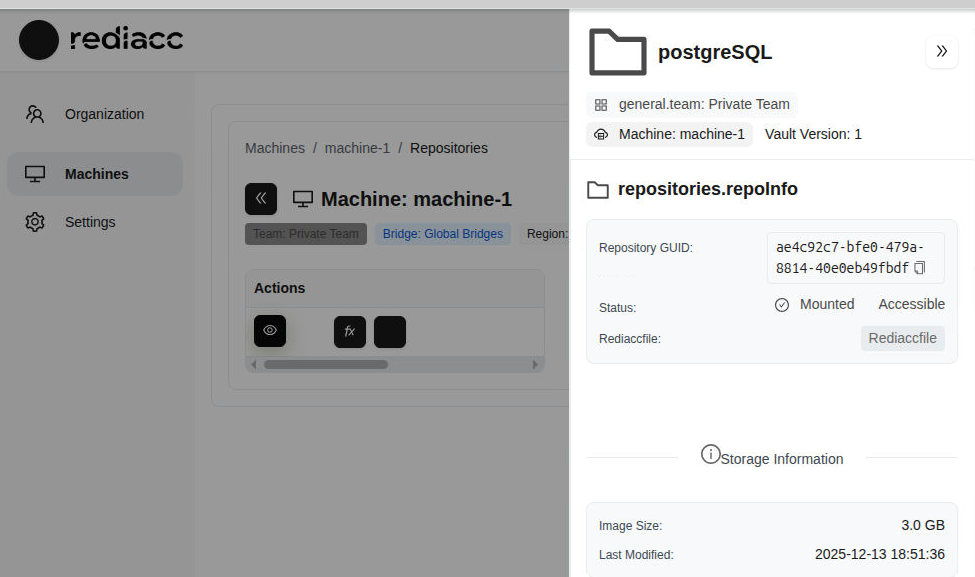
2.5.12 Repository Details
To get detailed information about the repository:
- Select the repository.
- Click the eye icon (View Details).
 (Figure 71: Eye icon to open repository details)
- Review information in the detail panel:
- Repository name and type
- Team: The team it belongs to
- Machine: The machine it’s on
- Vault Version: Encryption version
- Repository GUID: Unique identifier
- Status: Mounted/Unmounted status
- Image Size: Total size
- Last Modified: Last modification date
 (Figure 72: Comprehensive information about the selected repository)
Tip: All information shown in this panel is for reference. Use fx menu options for repository operations.
2.6 Repository Connection Operations
You can connect to repositories using different methods.
2.6.1 Desktop Application Connection
- Click the Local button in the repository row.
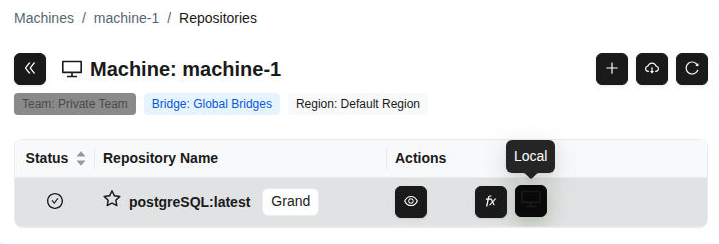 (Figure 73: “Local” button in repository row - desktop application access)
- Select the access method from the dropdown menu:
- desktop-app: Access with graphical interface
- VS Code: Open in code editor
- Terminal: Access via command line
- cli commands: Command line tools
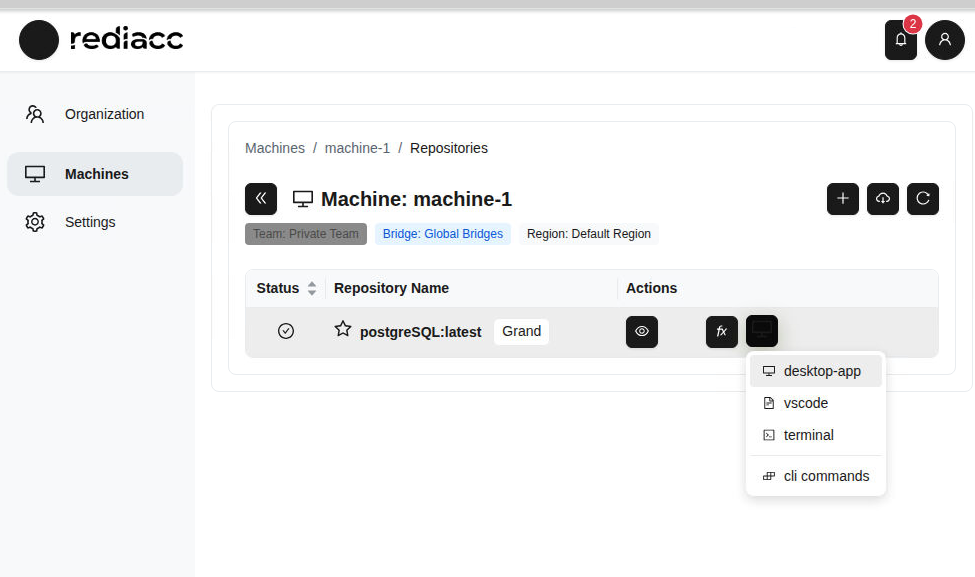 (Figure 74: Repository connection menu - different access paths)
Tip: If working with VS Code, the “VS Code” option provides the fastest integration.
- Click the Open button when the browser requests permission.
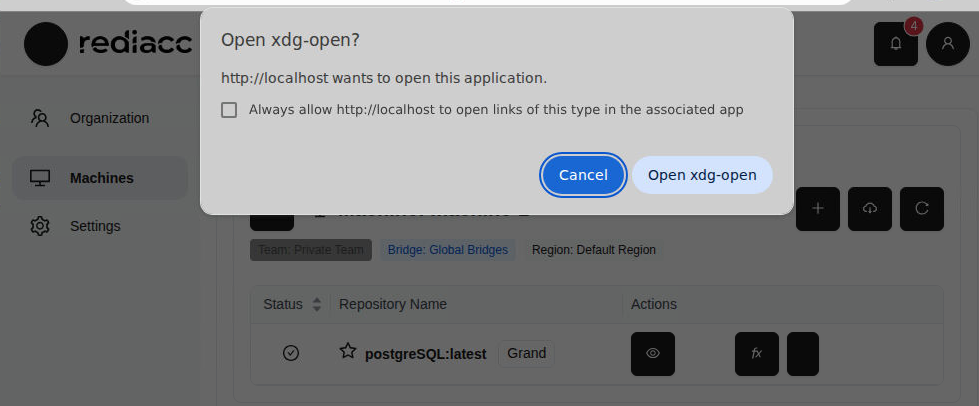 (Figure 75: Browser asking for permission to open desktop application)
Tip: If you don’t want to grant permission every time you open the desktop application, check the “Always allow” option.
2.7 Settings
You can manage your profile and system settings from the Settings section.
2.7.1 Password Change
- Go to Settings > Profile tab from the left menu.
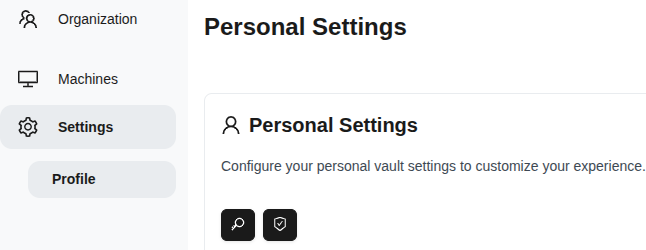 (Figure 76: Settings → Profile page - personal vault settings)
- Click the Change Password button.
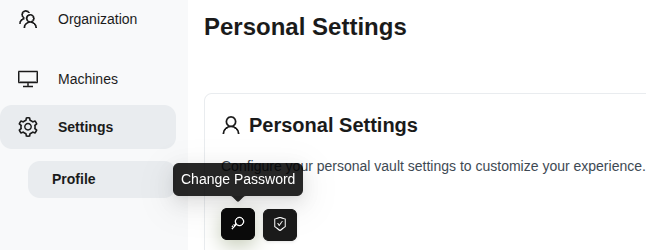 (Figure 77: “Change Password” button in personal settings section)
-
Enter your new password. Password requirements:
- At least 8 characters long
- Must contain uppercase and lowercase letters
- Must contain at least one number
- Must contain at least one special character
-
Re-enter the same password in the Confirm New Password field.
-
Click the Change Password button.
 (Figure 78: Change Password form - security requirements visible)
Tip: Use random combinations when creating a strong password.
2.8 Storage
The Storage section allows you to manage the physical areas where your backup data will be stored.
2.8.1 Adding Storage
- Go to the Storage tab from the left menu.
- Click the Add Storage button.
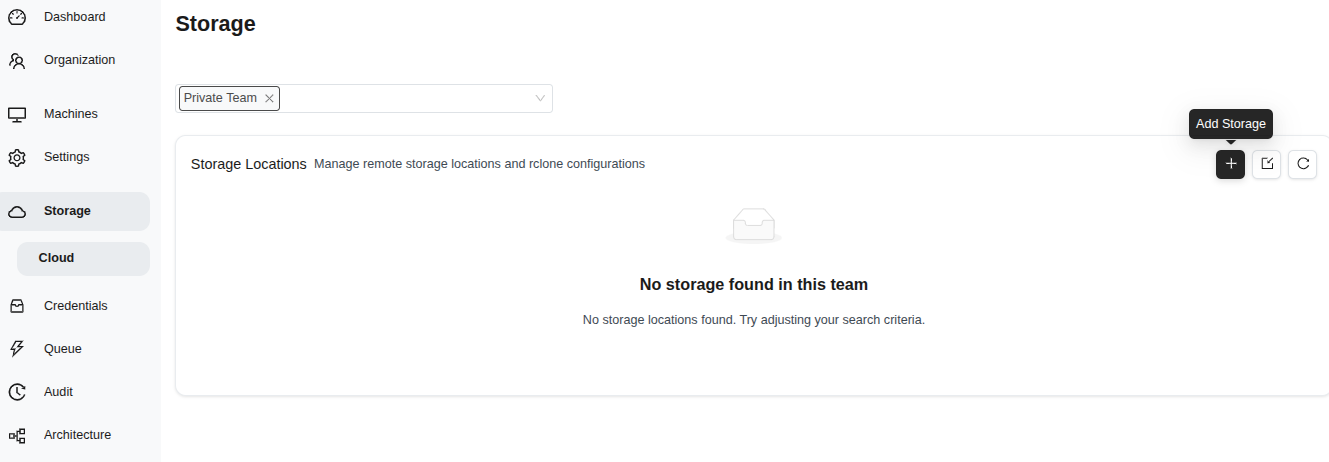 (Figure 79: Storage management page - “Add Storage” button)
- Fill in the form:
- Storage Name: Enter a descriptive name
- Storage Provider: Select (e.g., s3)
- Description: Add optional description
- Disable Versioning: Optional
- Additional Parameters: rclone flags (e.g., —transfers 4)
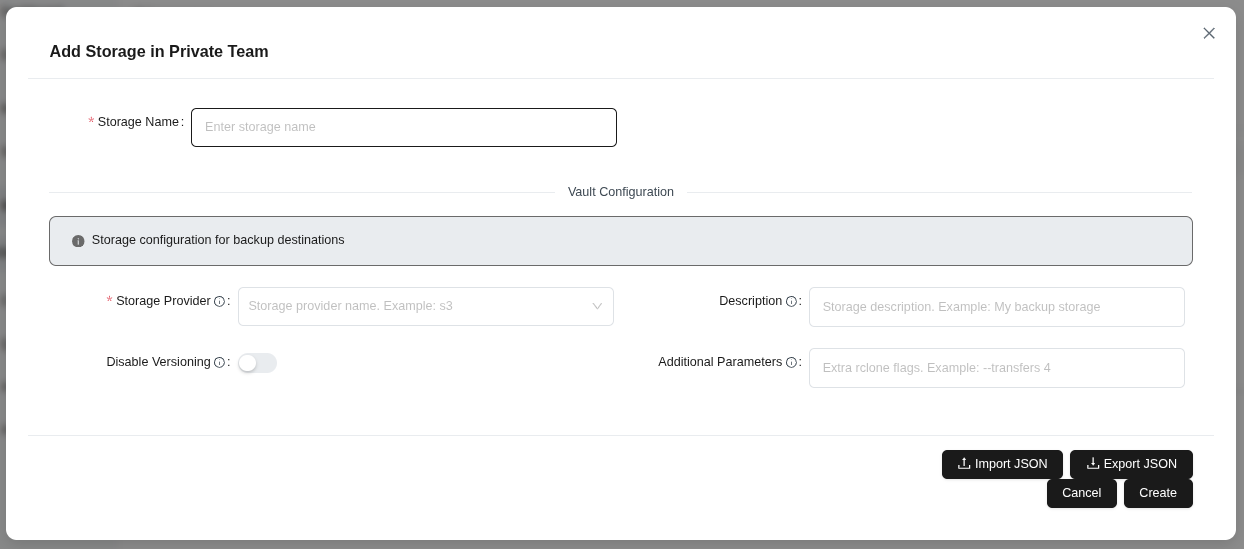 (Figure 80: Add Storage form - name, provider, description, and parameters)
- Click the Create button.
Tip: Additional Parameters accept rclone flags to optimize storage performance.
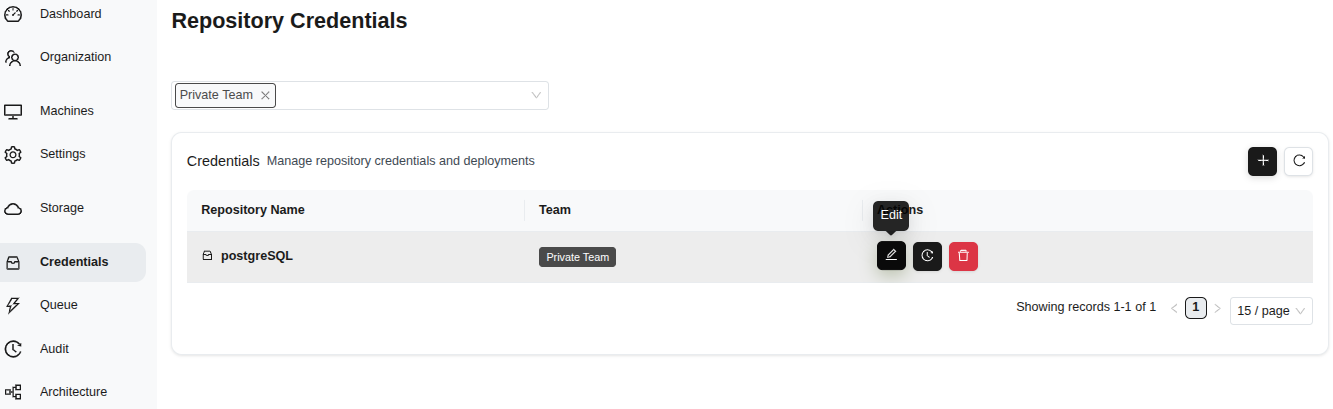
2.9 Credentials
The Credentials section allows you to securely manage access information for your repositories.
2.9.1 Credential Editing
- Go to the Credentials tab from the left menu.
- Select the record you want to edit.
- Click the Edit button.
 (Figure 81: Credentials page - repository names, teams, and management buttons)
- Change the Repository Name if needed.
- Save with the Save button.
 (Figure 82: Edit Repository Name form - vault configuration fields)
Tip: Credentials are stored encrypted and only decrypted during deployment.
2.9.2 Credential Trace
- Select the record you want to trace.
- Click the Trace button.
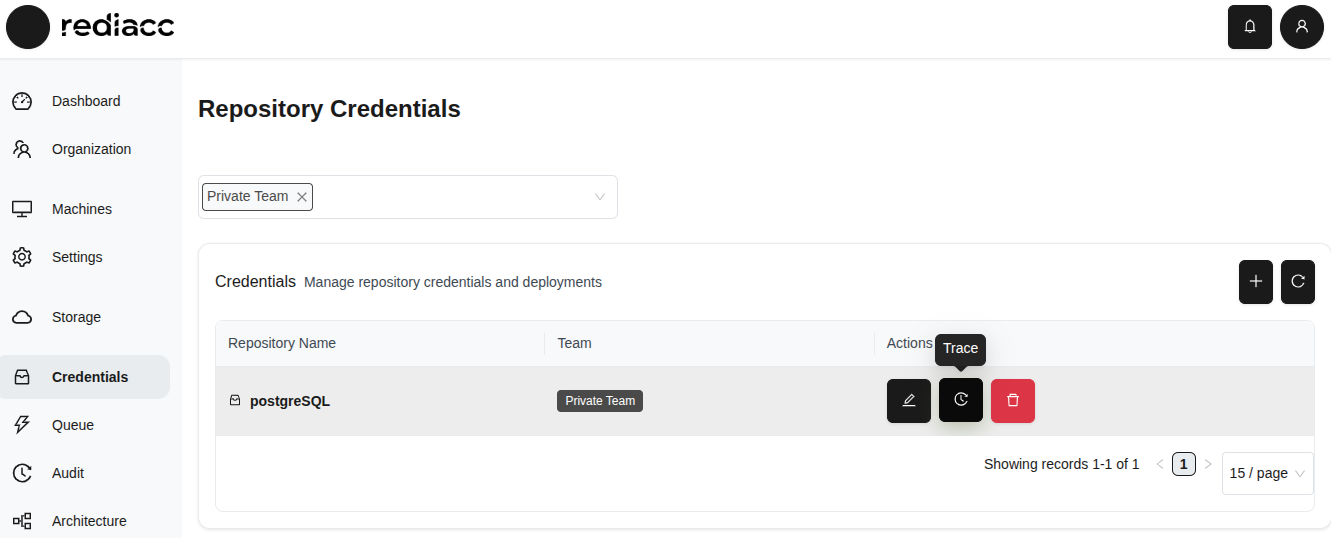 (Figure 83: “Trace” button in Credentials table)
- Review the audit history.
- Select format from the Export button: Export as CSV or Export as JSON.
 (Figure 84: Credentials list - Export options)
Tip: The trace feature provides usage tracking of credentials for security audit purposes.
2.9.3 Credential Deletion
- Select the record you want to delete.
- Click the red Delete button.
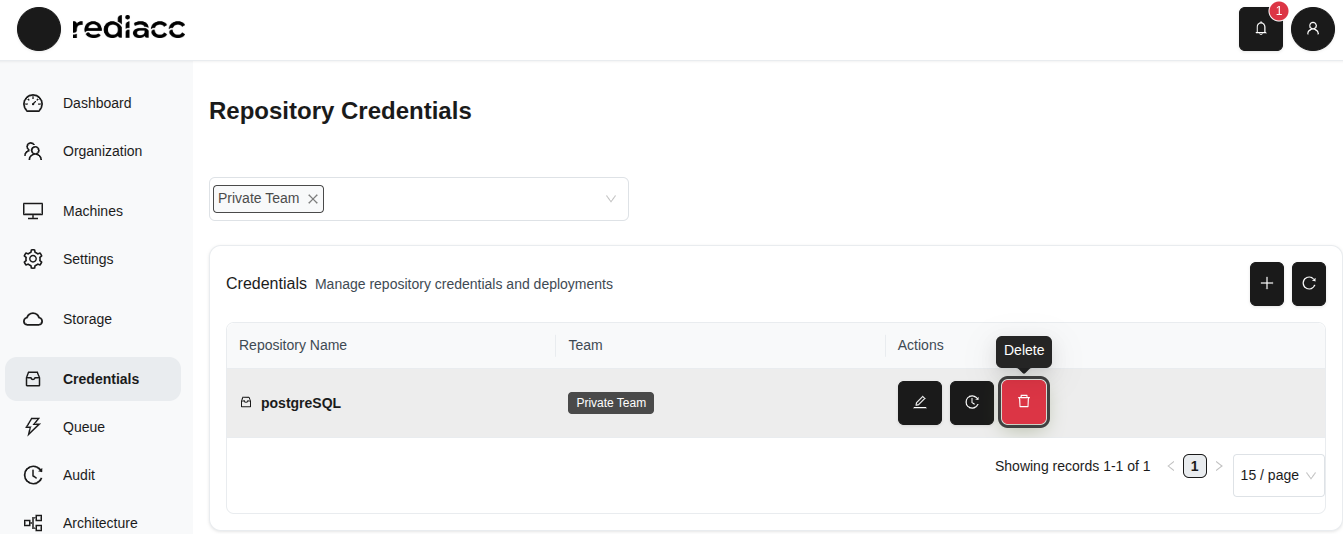 (Figure 85: Red “Delete” button on Credentials page)
- Click the Delete button in the confirmation window.
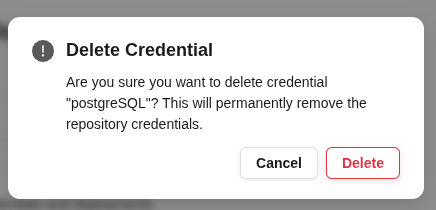 (Figure 86: Deletion confirmation dialog - irreversible action warning)
Warning: Before deleting, make sure the credential is not being used on other machines or in other operations. Ensure you have a backup of critical credentials before deleting.
2.10 Queue
The Queue section allows you to track pending and completed operations in the system.
2.10.1 Queue Operations
- Click the Queue tab from the left menu.
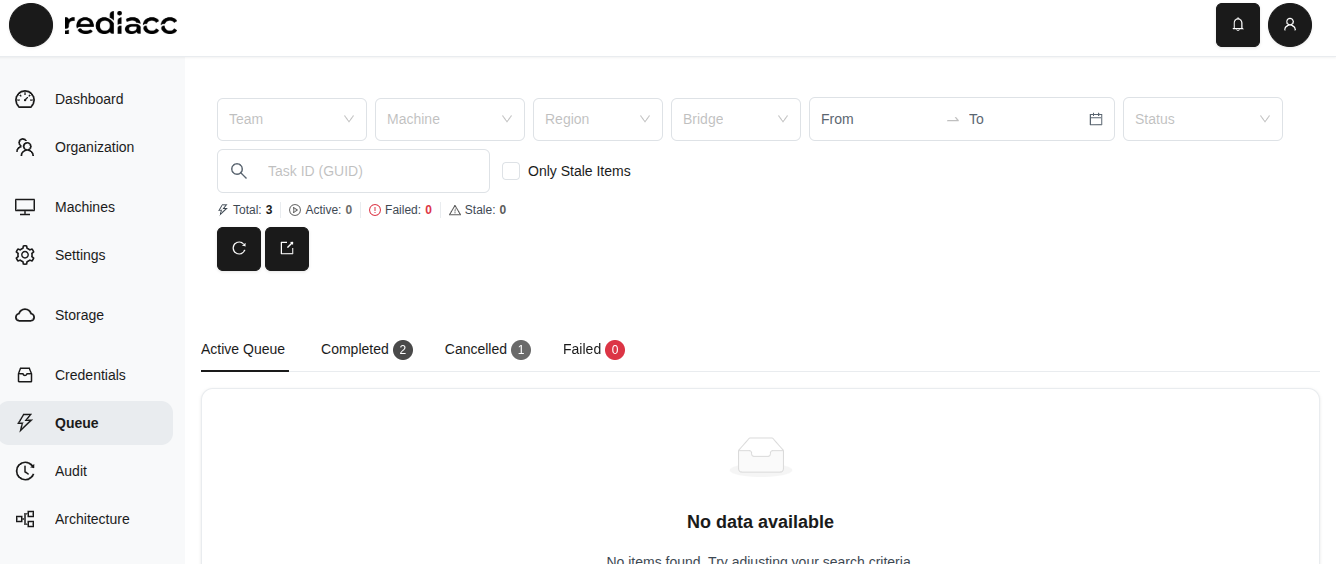 (Figure 87: Queue page - filtering options and status tabs)
-
To filter queue items:
- Use Team, Machine, Region, and Bridge filters
- Specify Date Range
- Check Only Stale Items option
-
View details in status tabs:
- Active: Tasks being processed
- Completed: Successfully completed tasks
- Cancelled: Cancelled tasks
- Failed: Failed tasks
-
Select a format from the Export button: Export as CSV or Export as JSON.
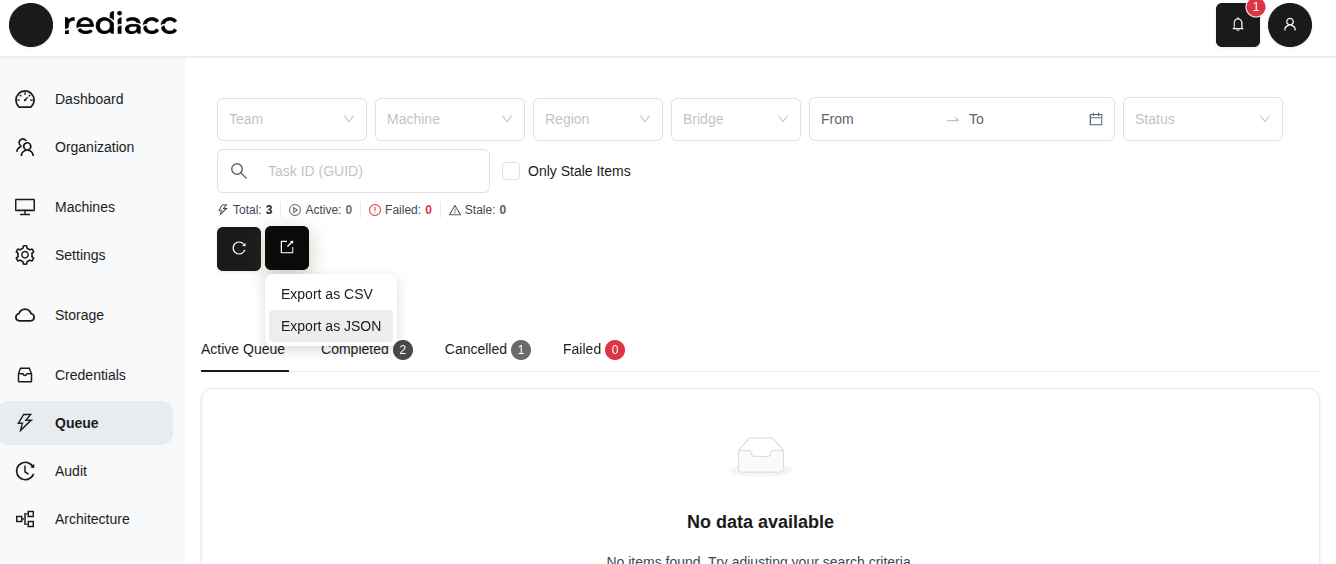 (Figure 88: Queue list - Export options)
Tip: The “Only Stale Items” option helps find tasks that have been processing for a long time. Regularly export queue history to analyze task execution trends.
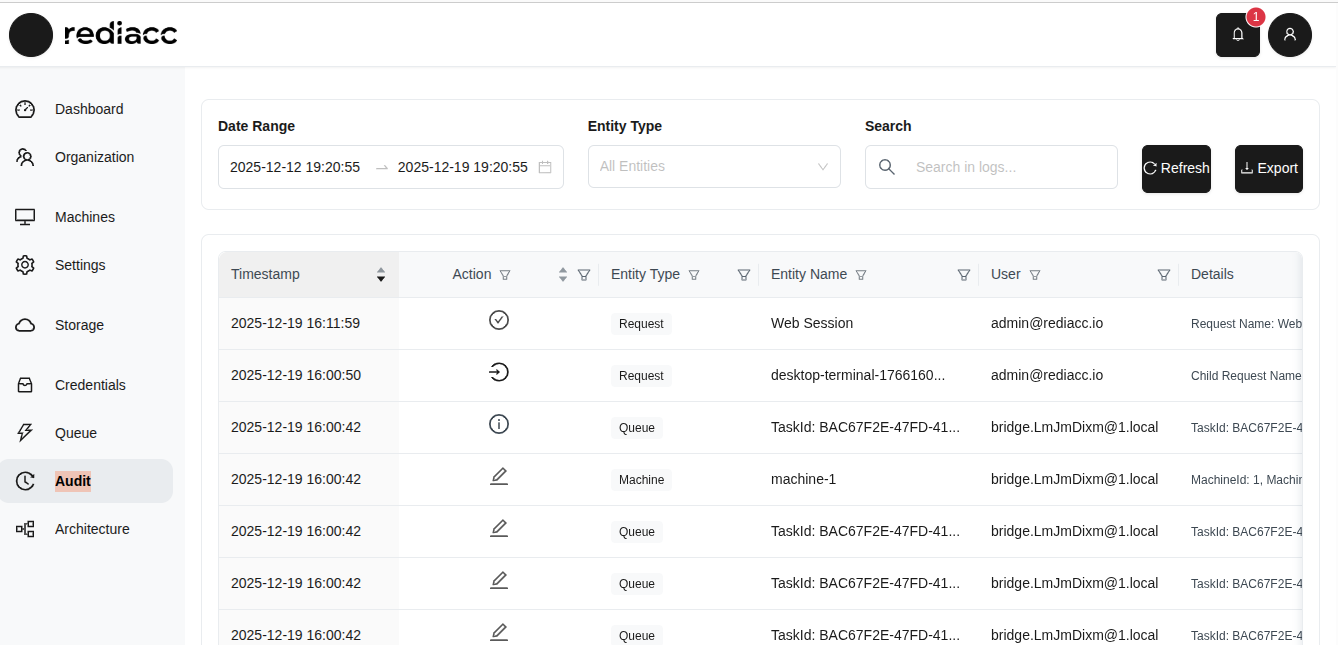
2.11 Audit
The Audit section maintains records of all operations performed in the system.
2.11.1 Audit Records
- Click the Audit tab from the left menu.
 (Figure 89: Audit page - detailed record of all system operations)
-
Filter audit records:
- Date Range: Filter for a specific period
- Entity Type: Filter by Request, Machine, Queue, etc.
- Search: Perform text search
-
Review information for each record:
- Timestamp: Date and time of the operation
- Action: Type of operation (Create, Edit, Delete, etc.)
- Entity Type: Type of object affected
- Entity Name: Specific object identifier
- User: User who performed the operation
- Details: Additional information about the operation
-
Select a format from the Export button: Export as CSV or Export as JSON.
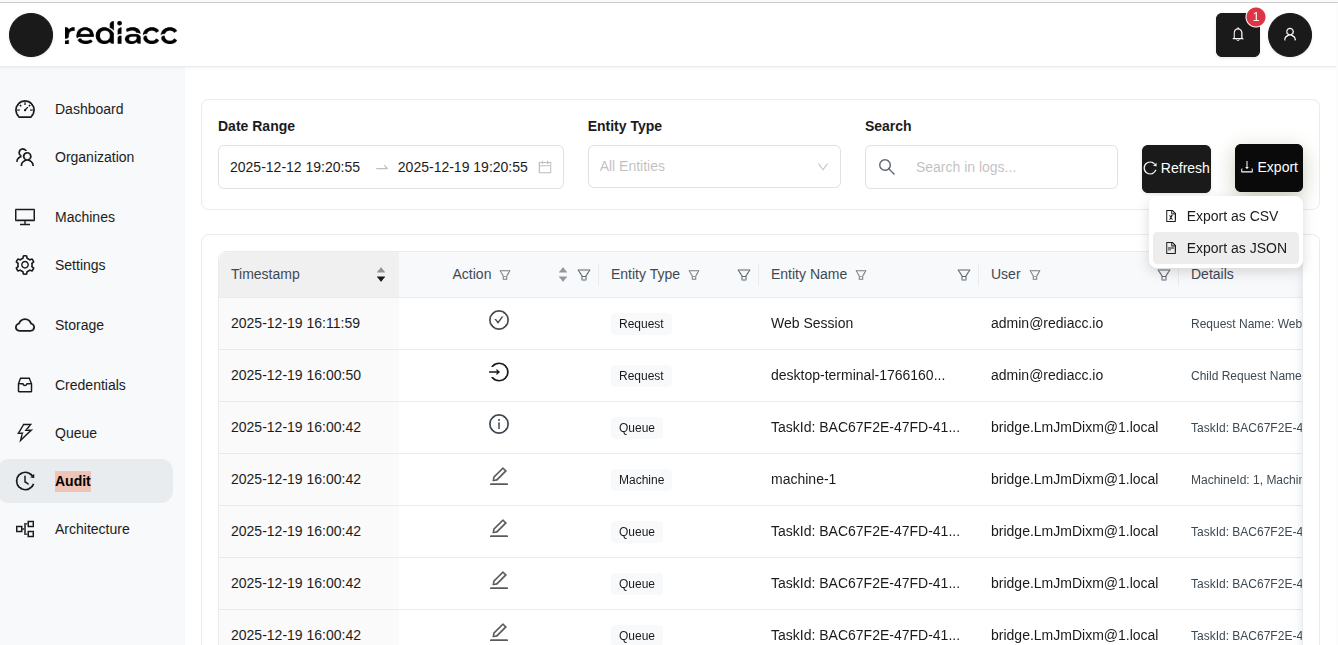 (Figure 90: Audit record export - CSV and JSON options)
Tip: The audit record is critical for tracking all system activity for security and compliance purposes. Regularly export the audit record and store it in a secure location.
© 2025 Rediacc Platform – All Rights Reserved.